内核源码下载与编译 要完成对 Linux 内核的漏洞利用与调试等,我们首先需要搭建一个可用的 Linux 运行环境。本节主要讲述如何获取内核源码并编译生成内核镜像文件(bzImage),我们将在下一节讲述如何利用 bzImage 和 BusyBox 搭起一个简易的运行环境。
相比于直接从Wiki上复制粘贴,我这里还补充了其中遇到的一些坑。
下载内核源码 The Linux Kernel Archives 为我们提供了原始的主线内核不同版本的源代码,我们可以在该网站上下载自己所需要的版本的内核源码,或是在不同的镜像站中获取,例如 清华大学开源软件镜像站 便提供了不同版本的内核源码。
根据 Archive kernel releases ,我们可以知道内核主要有以下几种类别:
Prepatch (RC) :主线内核的预发布版本,包含了最新的待测试的内核特性,由 Linus Torvalds 维护。
Mainline:主线内核版本,RC 版本的新特性经过测试后便会合并到主线,每 9~10 周发一个版本,由 Linus Torvalds 维护。
Stable:主线内核发布后便会变为 Stable 状态,其仅会被 stable kernel 维护者从主线树后向移植一些漏洞修复,直到下个内核版本释出。Stable kernel 根据需要进行更新,通常是一周一次。
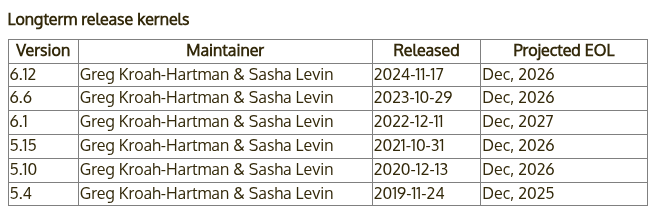
Longterm:部分内核版本会被选作长期支持版(LTS),相比起 Stable 内核有着更久的支持时长,通常仅会被后向移植重要的漏洞修复,且更新周期较慢(尤其是对于更老的版本)。
这里我们选择最近的 Longterm 版本的内核 6.12,其由 Greg Kroah-Hartman & Sasha Levin 进行维护,发行日期为 2024-11-17,计划将在 Dec, 2026 结束支持。
这里我们可以注意到内核团队会在同一时间段统一停止对一批 LTS 版本内核的支持,而非每个 LTS 版本都有着相同长度的生命周期。
我们选择下载与编译最新的 LTS 版本 6.12.16 ,该版本于 2025-02-21 发布。为了加速下载进程,我们选择使用清华的镜像站进行下载,并进行解压:
1
2
3
4
5
6
7
8
9
10
11
12
13
14
15
16
17
18
19
20
21
# zer0ptr @ DESKTOP-9V45QK9 in ~/Kernel [18:56:34] $ wget https://mirrors.tuna.tsinghua.edu.cn/kernel/v6.x/linux-6.12.16.tar.xz # zer0ptr @ DESKTOP-9V45QK9 in ~/Kernel [19:22:51] $ unxz ./linux-6.12.16.tar.xz
验证内核签名 为了防止内核被恶意修改,内核团队提供了签名校验,在发布内核时,发布者会对内核进行签名。因此为了校验,我们首先需要导入内核维护者的公钥,这里我们选择导入 Linus Torvalds 和 Greg Kroah-Hartman 的公钥:
1
2
3
4
5
6
7
8
9
10
11
# zer0ptr @ DESKTOP-9V45QK9 in ~/Kernel [19:24:12] $ gpg2 --locate-keys torvalds@kernel.org gregkh@kernel.org
接下来我们从清华大学镜像站下载内核签名进行校验:
1
2
3
4
5
6
7
8
9
10
11
12
13
14
15
16
17
18
19
20
21
22
23
# zer0ptr @ DESKTOP-9V45QK9 in ~/Kernel [19:24:44] $ wget https://mirrors.tuna.tsinghua.edu.cn/kernel/v6.x/linux-6.12.16.tar.sign # zer0ptr @ DESKTOP-9V45QK9 in ~/Kernel [19:25:07] $ gpg2 --verify linux-6.12.16.tar.sign
注意到这里报了一个 WARNING,因为我们导入的公钥没有可信的签名,无法证明其确实来自于 Linus Torvalds 和 Greg Kroah-Hartman。为了消除这个问题,我们可以选择使用 TOFU 信任对应的密钥:
1
2
3
# zer0ptr @ DESKTOP-9V45QK9 in ~/Kernel [19:25:46] $ gpg2 --tofu-policy good 38DBBDC86092693E
接下来我们重新对内核签名进行验证,现在可以发现已经没有报错了,说明这份内核源码是可信的:
1
2
3
4
5
6
7
8
# zer0ptr @ DESKTOP-9V45QK9 in ~/Kernel [19:26:14] $ gpg2 --trust-model tofu --verify ./linux-6.12.16.tar.sign
配置编译选项 在正式进行内核源码编译之前,我们还需要准备一份编译选项,其包含了内核编译相关的配置,通常存放于源码目录下的 .config 文件中。不过我们不需要从零开始手动编写,而是可以通过内核的编译配置系统进行动态生成。
通常情况下,我们在内核源码目录下使用如下命令进入图形化的内核配置面板, 这也是最常用的内核配置方法 ,其会读取 .config 文件的配置并允许我们在图形化的界面中进行修改,并在该文件不存在时则是会调用 make defconfig 先生成一份默认配置:
需要注意,图形化配置界面依赖于 ncurses 库,这通常可以从你的发行版仓库安装。
1
2
# zer0ptr @ DESKTOP-9V45QK9 in ~/Kernel/linux-6.12.16 [19:27:33] $ make menuconfig
由此我们可以知道以下命令会直接生成上面命令的默认输出结果——make defconfig 生成一份默认的内核配置,其会读取 arch/架构/configs 目录下的配置文件作为基础配置,其包括一份默认启用的内核功能以及驱动编译配置等,这通常会编译上绝大部分常见的驱动,并根据当前系统环境进行相应的微调(例如与硬件平台相关的一些配置):
相应地,你可以手动地为每个内核编译选项进行配置,下面的这个命令不会读取默认配置,而会逐条询问每一条内核配置是否开启,用户需要在命令行逐条回复 y (编译进内核)、m (作为内核模块编译,部分配置会提供该选项) 、n(不编译),如果你有较多的空闲时间且对内核架构有着较为完整的了解,可以考虑运行这个命令进行配置:
此外,你可以使用如下的命令(任选一条)来动态检测当前环境所包含的内核模块(lsmod 命令所显示的内核模块),并在内核编译过程中仅编译这些模块,这通常适合嵌入式开发等需要定制化精简与裁剪内核的场景, 但往往不适合通用场景 :
1
2
make localyesconfig # 将驱动编译到内核当中
相对应的,如下命令(任选一条)会尽可能多地启用可用的内核选项,在生成的配置中包含了尽可能多的内核特性与驱动:
1
2
make allyesconfig # 将驱动编译到内核当中
调试相关选项 这里我们主要关注调试方面的选项,依次进入到 Kernel hacking -> Compile-time checks and compiler options,然后勾选如下选项 Compile the kernel with debug info ,以便于调试。这通常是默认开启的。
如果要使用 kgdb 调试内核,则需要选中 KGDB: kernel debugger,并选中 KGDB 下的所有选项。
编译内核 接下来我们进行内核镜像的编译,我们通常要获得的是压缩后的内核镜像文件 bzImage ,因此我们在源码目录下使用如下命令进行编译:
此外,我们可以根据当前机器的配置使用多个线程进行编译,-j 参数指定了同时进行编译的内核数量,(nproc) 变量则通常代表你所使用的机器所拥有的硬件线程数:
此外,你可以通过 CC= 来指定所使用的编译器,通过 LD= 来指定所使用的链接器,通过 LLVM= 来指定所使用的 LLVM 工具链所在目录。
现在我们来开始编译叭,康康怎么个事
可以用这个安装编译需要的常见依赖:
1
2
3
sudo apt install build-essential libncurses-dev libssl-dev \
1
2
3
4
5
6
7
# zer0ptr @ DESKTOP-9V45QK9 in ~/Kernel/linux-6.12.16 [19:36:43] $ make defconfig # zer0ptr @ DESKTOP-9V45QK9 in ~/Kernel/linux-6.12.16 [19:39:14] $ make bzImage
最后,当终端出现如下信息时,说明编译完成:
1 Kernel: arch/x86/boot/bzImage is ready (#1)
我们主要关注于编译产物中的两个文件:
vmlinux:编译生成的 ELF 格式的原始内核镜像文件,通常位于源码根目录下。bzImage:前者进行压缩后的内核镜像文件,通常位于 arch/架构/boot/bzImage (注意对于 x86-64 而言仍是 x86 目录)。
这里我们给出常见内核文件格式的介绍:
bzImage :目前主流的 kernel 镜像格式,即 big zImage(即 bz 不是指 bzip2),适用于较大的(大于 512 KB) Kernel。这个镜像会被加载到内存的高地址,高于 1MB。bzImage 是用 gzip 压缩的,文件的开头部分有 gzip 解压缩的代码,所以我们不能用 gunzip 来解压缩。zImage :比较老的 kernel 镜像格式,适用于较小的(不大于 512KB) Kernel。启动时,这个镜像会被加载到内存的低地址,即内存的前 640 KB。zImage 也不能用 gunzip 来解压缩。vmlinuz :vmlinuz 不仅包含了压缩后的 vmlinux,还包含了 gzip 解压缩的代码。实际上就是 zImage 或者 bzImage 文件。该文件是 bootable 的。 bootable 是指它能够把内核加载到内存中。对于 Linux 系统而言,该文件位于 /boot 目录下。该目录包含了启动系统时所需要的文件。vmlinux :静态链接的 Linux kernel,以可执行文件的形式存在,尚未经过压缩。该文件往往是在生成 vmlinuz 的过程中产生的。该文件适合于调试。但是该文件不是 bootable 的。vmlinux.bin :也是静态链接的 Linux kernel,只是以一个可启动的 (bootable) 二进制文件存在。所有的符号信息和重定位信息都被删除了。生成命令为:objcopy -O binary vmlinux vmlinux.bin。uImage :uImage 是 U-boot 专用的镜像文件,它是在 zImage 之前加上了一个长度为 0x40 的 tag 而构成的。这个 tag 说明了这个镜像文件的类型、加载位置、生成时间、大小等信息。
编写一个 Loadable Kernel Module 基本内核模块 我们首先写一个基础的内核模块,源码文件结构组织如下:
1
2
3
4
5
6
7
8
$ tree .
main.c 的内容如下,其定义了一个初始化函数 a3kmod_init() ,该函数会在模块载入时被调用,同时其定义了一个退出函数 a3kmod_exit() ,该函数会在模块被卸载时被调用:
1 2 3 4 5 6 7 8 9 10 11 12 13 14 15 16 17 18 19 20 21 22 23 24 25 #include <linux/kernel.h> #include <linux/module.h> #include <linux/init.h> static __init int a3kmod_init (void ) "[a3kmod:] Hello kernel world!\n" );return 0 ;static __exit void a3kmod_exit (void ) "[a3kmod:] Goodbye kernel world!\n" );"arttnba3" );"GPL v2" );
Kbuild 构建系统 Kbuild 是 Linux kernel 构建系统的一部分,简而言之,当我们在源码目录下编写了 Kbuild 文件之后,在编译时 Linux kernel 的编译基础设施便会根据 Kbuild 来自动地编译好我们的内核模块,若没有 Kbuild 则会选择寻找 Makefile 。
1
2
3
4
5
6
7
8
9
# module name # compiler flags # entry point $ (MODULE_NAME)-y += main.o
各符号说明如下:
MODULE_NAME :一个简单的自定义变量,我们用来定义我们的模块名。
obj-m :这个符号用来指定要被编译的内核模块列表,+= 意味着添加上我们的内核模块,而 $(MODULE_NAME).o 则是我们的内核模块编译的后期产物,这通常由单个或多个目标文件合并而成,最后会被链接为 $(MODULE_NAME).ko 文件,也就是我们所熟悉的 LKM ELF;如果要将模块编译进内核 ELF 文件(vmlinux)中,则应当使用 obj-y。
ccflags-y :ccflags 意味着编译选项,-y 意味着开启的编译选项,这里我们添加了 -I 选项以引入我们自己的头文件目录(只是作为示范,本节实际上不涉及复杂代码结构),更多编译选项可以参见 GCC 的文档。
$(MODULE_NAME)-y :$(MODULE_NAME).o 所需要的目标文件,-y 意味着编译过程需要该文件,这里我们加入了一个 main.o ,意味着我们的源码目录下应当有一个 main.c。
相应地,由于我们已经在 Kbuild 当中指示了模块的构建行为,我们只需要在源码根目录的 Makefile 当中写入通用性内容,这里我们的 Makefile 写入如下:
1
2
3
4
5
6
7
8
9
10
11
12
13
14
# SPDX-License-Identifier: GPL-2.0 # Copyright (c) 2025 arttnba3 <arttnba@gmail.com>
简要说明如下(想更详细了解可自行深入学习 Makefile 语法):
A3KMOD_ROOT_DIR 、 A3KMOD_SRC_DIR :这些变量指定了源码目录为当前目录下的 src 文件夹,$(shell pwd) 意味着其值为 pwd 命令的结果。
LINUX_KERNEL_SRC :这个变量指定了 Linux 内核源码目录,对于绝大多数 Linux 发行版而言,在安装了相应的软件包(例如 linux-headers )后,在 /lib/modules/$(shell uname -r)/build 目录下都会存放着当前所用内核的源码以及编译系统文件,其中 $(shell uname -r) 意味着其值为 uname -r 的结果。
all: :名为 all 的标签,在执行 make all 时会执行该标签下的命令,由于这是 Makefile 中的第一个命令,所以直接执行 make 默认会运行该命令。
@$(MAKE) :@$(MAKE) 指定了使用当前环境中的 MAKE 命令(这意味着我们在运行 make 命令时可以可以通过指定 MAKE= 更改其路径,默认值是 make )。-C $(LINUX_KERNEL_SRC) :make 指令进入到内核源码目录进行。modules :执行内核源码 Makefile 中的 modules 项,意味着进行内核模块编译行为。M=$(A3KMOD_SRC_DIR):指定参数 M 的值,对 modules 项而言代表要编译的内核模块的源码路径。
clean: :和 all 标签传递的基本一致,不同在于最后执行的行为是 clean ,意味着清理编译产物。
.PHONY:“伪目标”,即相比同名文件而言优先找 Makefile 中的标签定义,这里将 clean 标签声明为伪目标。
编译内核模块 完成这些之后,我们便能开始编译内核模块了,我们只需要运行如下命令:
如果你使用的是自行下载编译的内核源码,则在编译内核模块之前,你还需要在内核源码目录下先执行该命令:
内核模块的载入与卸载 我们可以通过 insmod 命令直接载入一个内核模块:
类似地,我们可以使用 rmmod 命令卸载一个内核模块:
提供用户态接口 接下来我们为我们的内核模块添加可供用户态应用程序交互的方式,一个比较常见的方式是我们的内核模块在载入后创建一个虚拟文件节点,用户态应用程序打开该节点后通过 read() 、 write() 、 ioctl() 等系统调用进行交互。
本节我们简单介绍如何创建一个可供用户态交互的 procfs ( Process file system )的文件节点。
文件节点交互 我们的文件节点支持通过 read() 、 write()、 ioctl() 等系统调用进行交互,而这实际上需要我们在内核空间当中定义相应的操作函数。对于 procfs 而言,其支持的操作通过 struct proc_ops 这一函数表进行定义:
1
2
3
4
5
6
7
8
9
10
11
12
13
14
15
16
17
struct proc_ops {unsigned int proc_flags;int (*proc_open)(struct inode *, struct file *);ssize_t (*proc_read)(struct file *, char __user *, size_t , loff_t *);ssize_t (*proc_read_iter)(struct kiocb *, struct iov_iter *);ssize_t (*proc_write)(struct file *, const char __user *, size_t , loff_t *);loff_t (*proc_lseek)(struct file *, loff_t , int );int (*proc_release)(struct inode *, struct file *);__poll_t (*proc_poll)(struct file *, struct poll_table_struct *);long (*proc_ioctl)(struct file *, unsigned int , unsigned long );#ifdef CONFIG_COMPAT long (*proc_compat_ioctl)(struct file *, unsigned int , unsigned long );#endif int (*proc_mmap)(struct file *, struct vm_area_struct *);unsigned long (*proc_get_unmapped_area) (struct file *, unsigned long , unsigned long , unsigned long , unsigned long ) ;
这里我们简单地为 proc_read() 与 proc_write() 实现对应的函数原型,其功能为拷贝数据到用户进程以及从用户进程读取数据,并将函数指针放入我们的 proc_ops 中:
1 2 3 4 5 6 7 8 9 10 11 12 13 14 15 16 17 18 19 20 21 22 23 24 25 26 27 28 29 30 31 32 33 34 35 36 37 38 39 40 41 42 43 44 45 46 47 48 49 50 51 52 53 54 55 56 57 58 59 60 61 62 63 64 65 66 67 68 69 #include <linux/proc_fs.h> #define A3KMOD_BUF_SZ 0x1000 static char a3kmod_buf[A3KMOD_BUF_SZ] = { 0 };static ssize_t a3kmod_proc_read (struct file *file, char __user *ubuf, size_t size, loff_t *ppos) ssize_t err;size_t end_loc, copied;if (end_loc < size || (*ppos) > A3KMOD_BUF_SZ) {return -EINVAL;if (end_loc > A3KMOD_BUF_SZ) {if (copied == 0 ) {return 0 ; if (err != 0 ) {return err;return copied;static ssize_t a3kmod_proc_write (struct file *file, const char __user *ubuf, size_t size, loff_t *ppos) ssize_t err;size_t end_loc, copied;if (end_loc < size || (*ppos) > A3KMOD_BUF_SZ) {return -EINVAL;if (end_loc > A3KMOD_BUF_SZ) {if (copied == 0 ) {return 0 ; if (err != 0 ) {return err;return copied;static struct proc_ops a3kmod_proc_ops =
创建文件节点 我们在模块初始化函数中调用 proc_create() 创建我们的 procfs 文件节点,各个参数分别指定了节点名、权限、父节点(为 NULL 则挂到 procfs 的根节点)、函数表,并在模块卸载时销毁该节点:
1
2
3
4
5
6
7
8
9
10
11
12
13
14
15
16
17
18
static struct proc_dir_entry *a3kmod_proc_dir_entry ;static __init int a3kmod_init (void ) "[a3kmod:] Hello kernel world!\n" );"a3kmod" , 0666 , NULL , &a3kmod_proc_ops);if (IS_ERR(a3kmod_proc_dir_entry)) {return PTR_ERR(a3kmod_proc_dir_entry);return 0 ;static __exit void a3kmod_exit (void ) "[a3kmod:] Goodbye kernel world!\n" );
上述过程中主要就是修改了 main.c,其完整内容如下:
1 2 3 4 5 6 7 8 9 10 11 12 13 14 15 16 17 18 19 20 21 22 23 24 25 26 27 28 29 30 31 32 33 34 35 36 37 38 39 40 41 42 43 44 45 46 47 48 49 50 51 52 53 54 55 56 57 58 59 60 61 62 63 64 65 66 67 68 69 70 71 72 73 74 75 76 77 78 79 80 81 82 83 84 85 86 87 88 89 90 91 92 93 94 95 96 97 98 99 100 101 102 103 104 105 106 107 108 #include <linux/kernel.h> #include <linux/module.h> #include <linux/init.h> #include <linux/proc_fs.h> #include <linux/uaccess.h> #define A3KMOD_BUF_SZ 0x1000 static char a3kmod_buf[A3KMOD_BUF_SZ] = { 0 };static struct proc_dir_entry *a3kmod_proc_dir_entry ;static ssize_t a3kmod_proc_read (struct file *file, char __user *ubuf, size_t size, loff_t *ppos) ssize_t err;size_t end_loc, copied;if (end_loc < size || (*ppos) > A3KMOD_BUF_SZ) {return -EINVAL;if (end_loc > A3KMOD_BUF_SZ) {if (copied == 0 ) {return 0 ; if (err != 0 ) {return err;return copied;static ssize_t a3kmod_proc_write (struct file *file, const char __user *ubuf, size_t size, loff_t *ppos) ssize_t err;size_t end_loc, copied;if (end_loc < size || (*ppos) > A3KMOD_BUF_SZ) {return -EINVAL;if (end_loc > A3KMOD_BUF_SZ) {if (copied == 0 ) {return 0 ; if (err != 0 ) {return err;return copied;static struct proc_ops a3kmod_proc_ops =static __init int a3kmod_init (void ) "[a3kmod:] Hello kernel world!\n" );"a3kmod" , 0666 , NULL , &a3kmod_proc_ops);if (IS_ERR(a3kmod_proc_dir_entry)) {return PTR_ERR(a3kmod_proc_dir_entry);return 0 ;static __exit void a3kmod_exit (void ) "[a3kmod:] Goodbye kernel world!\n" );"arttnba3" );"GPL v2" );
接着我们重新编译
1
2
make clean
测试模块 1 2 3 4 5 6 7 8 9 10 11 12 13 14 15 16 17 # 加载模块 # 检查 /proc 文件是否创建 # 测试写操作 # 测试读操作 # 查看内核日志 # 卸载模块
结果:
1 2 3 4 5 6 7 8 9 10 11 12 13 14 15 16 17 18 pwn@pwn:~/Desktop/Kernel$ sudo insmod src/a3kmod.ko
References